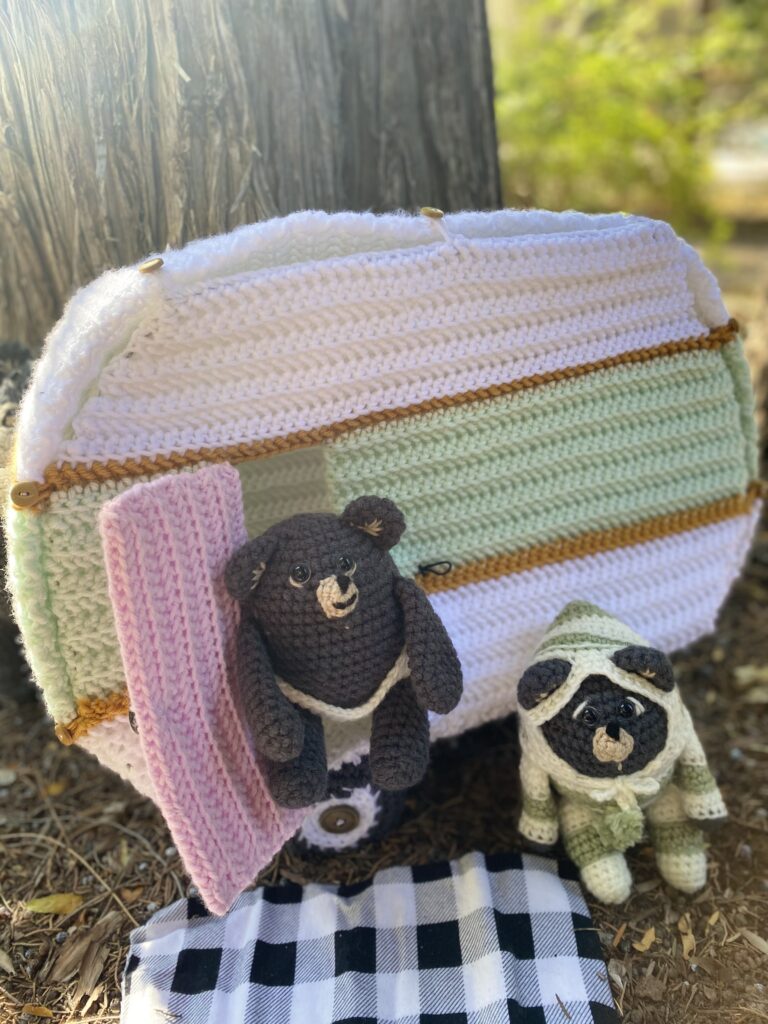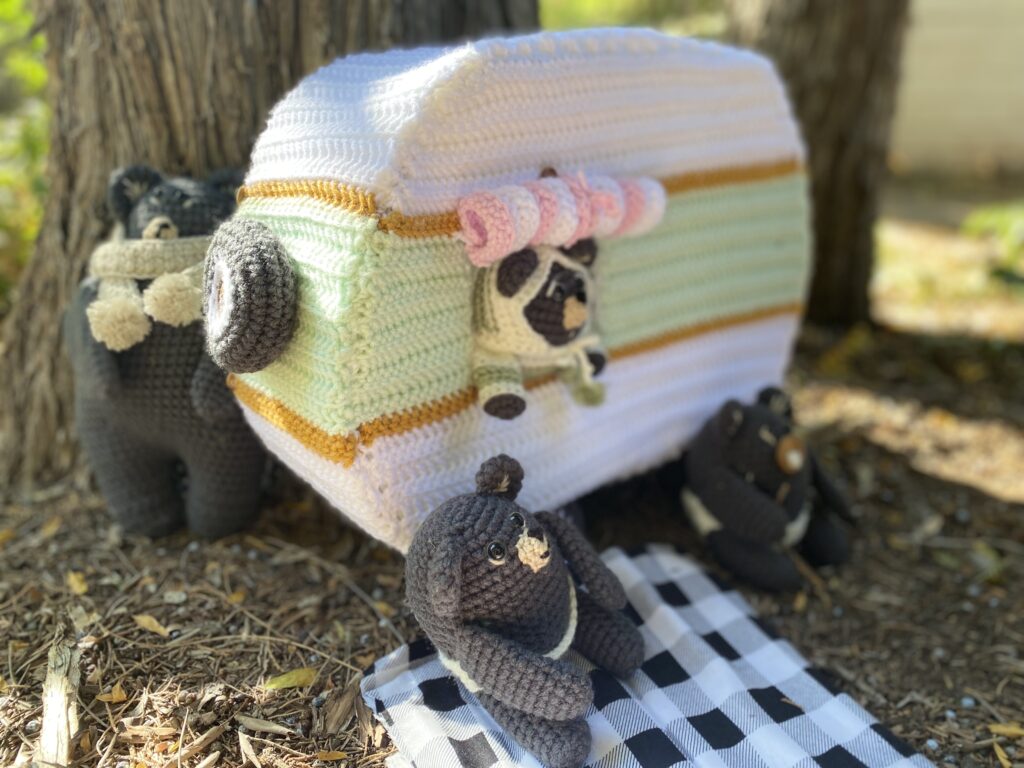
Summer Camp: Retro Camper Van
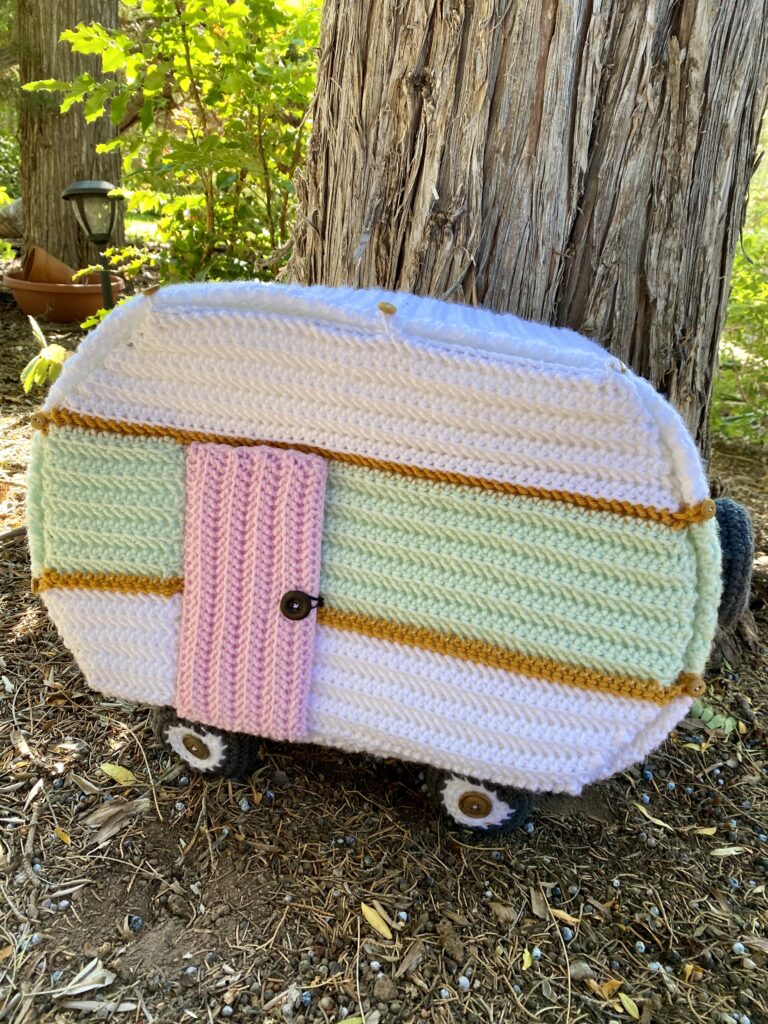
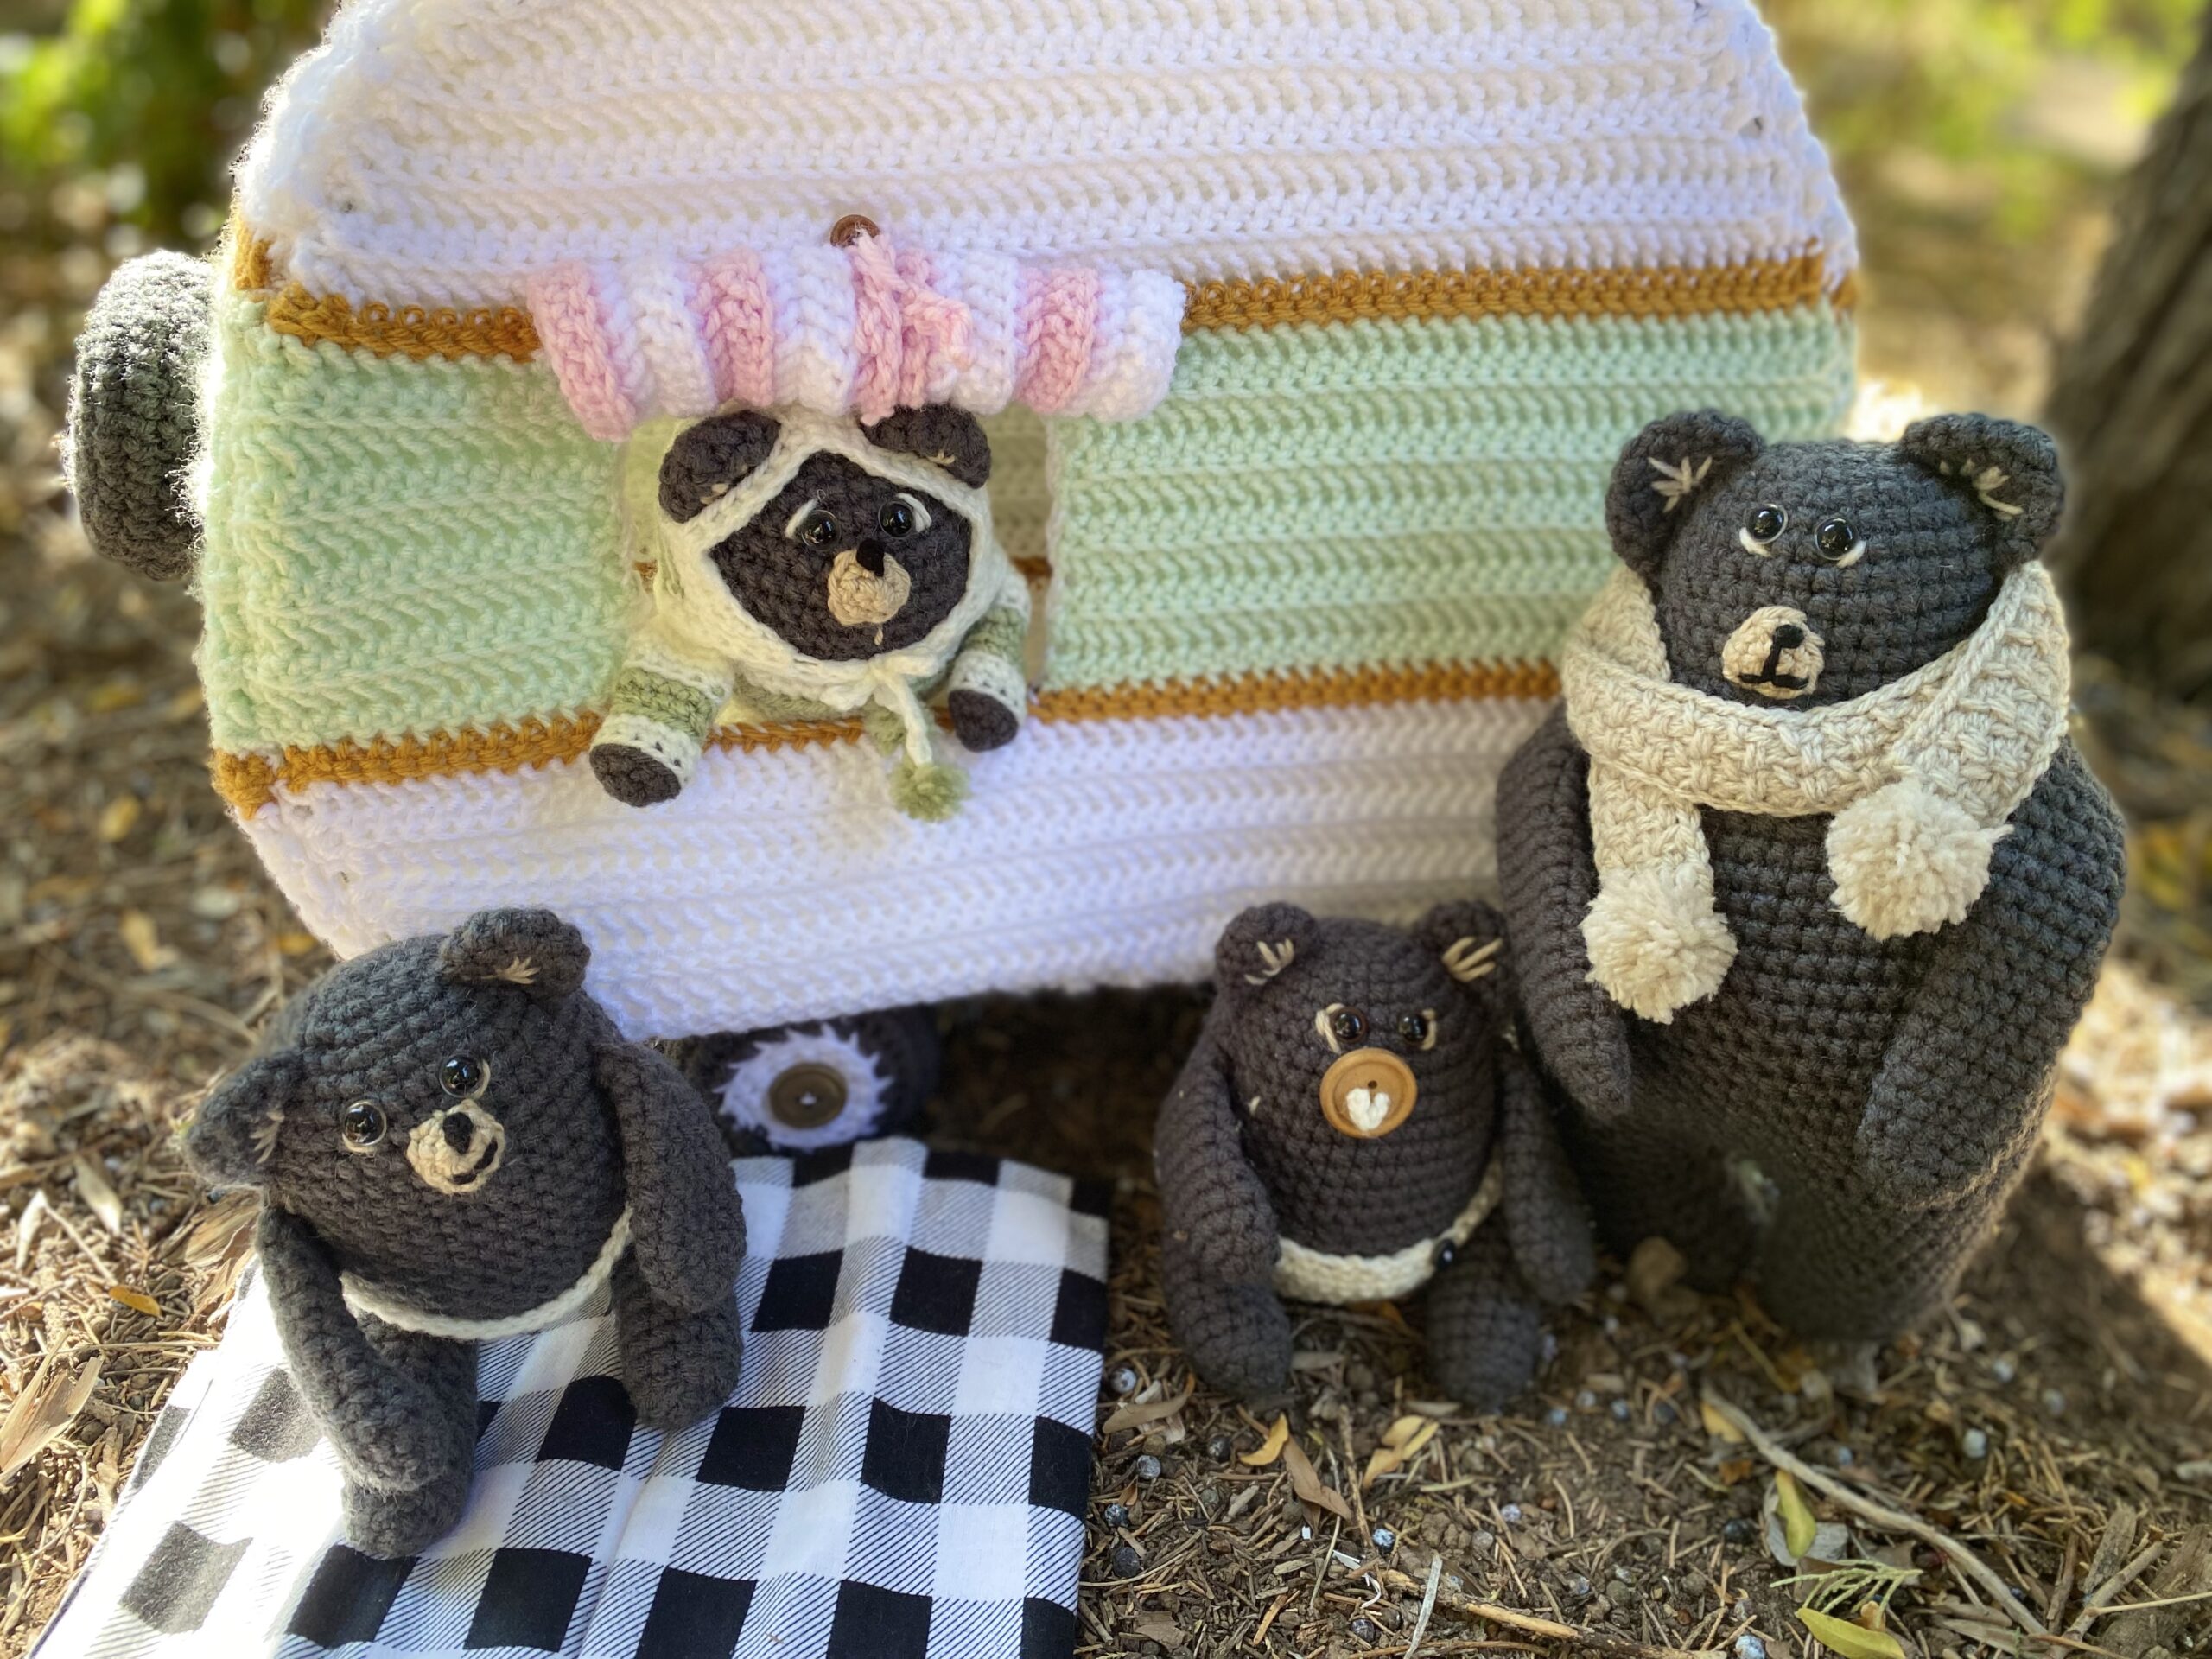
A camping trip with the baby bears? What could be more fun?
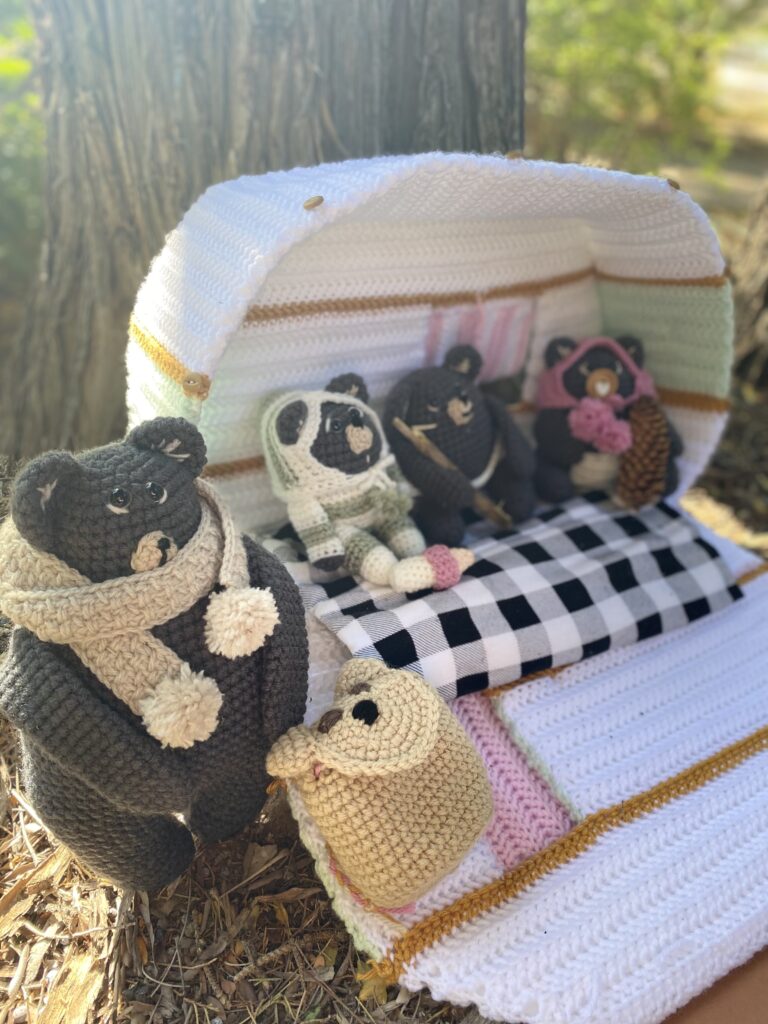
There are so many things for the baby bears to explore and learn. The adventurous bears are ready to venture out from the den to see new surroundings and try new things on their first camping trip in their retro Camper. They do all sorts of things while camping, everything from playing card games, fishing trips, stargazing, looking at the views, making s’mores and hiking. And every night mama bear puts them to bed and tells them stories. This is the life!
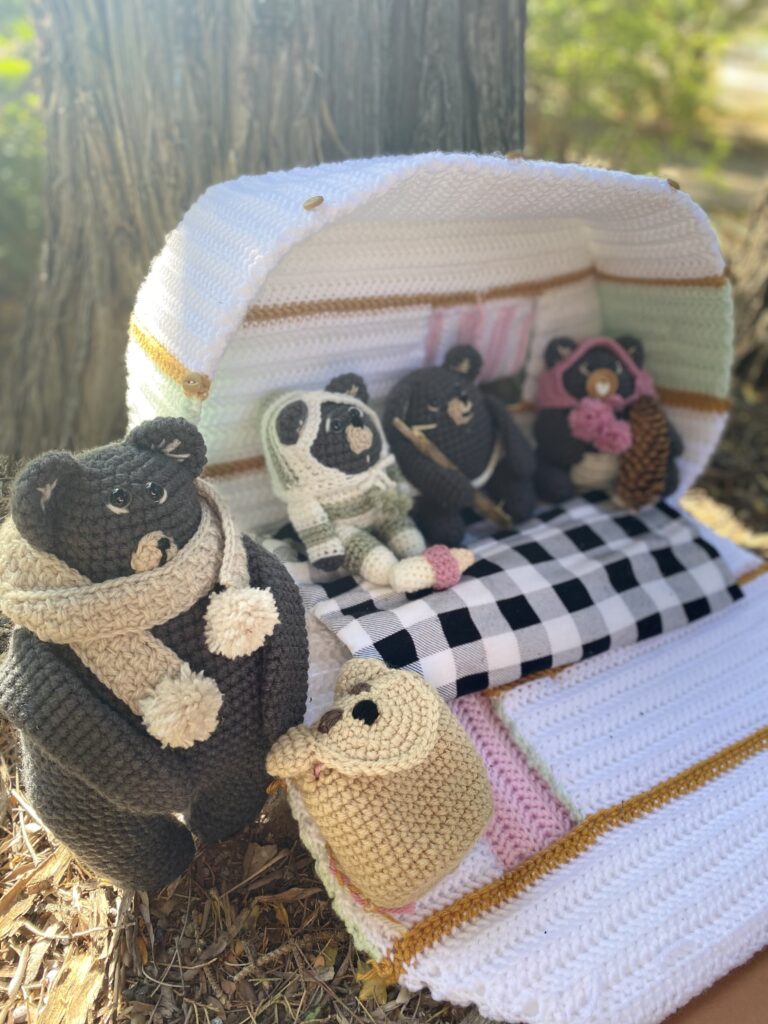
This retro camper was admittedly a larger project, but with just a few stitches to learn and some time, it was so much fun to create and is a great choice for intermediate or advanced beginner crocheters. With this pattern you’ll make your own Retro Camper for the bears.
- Here you’ll find the pattern for the baby bears.
- Here is the pattern for Mama Bear
- Here is a pattern for bottles, diapers and a diaper bag for the babies.
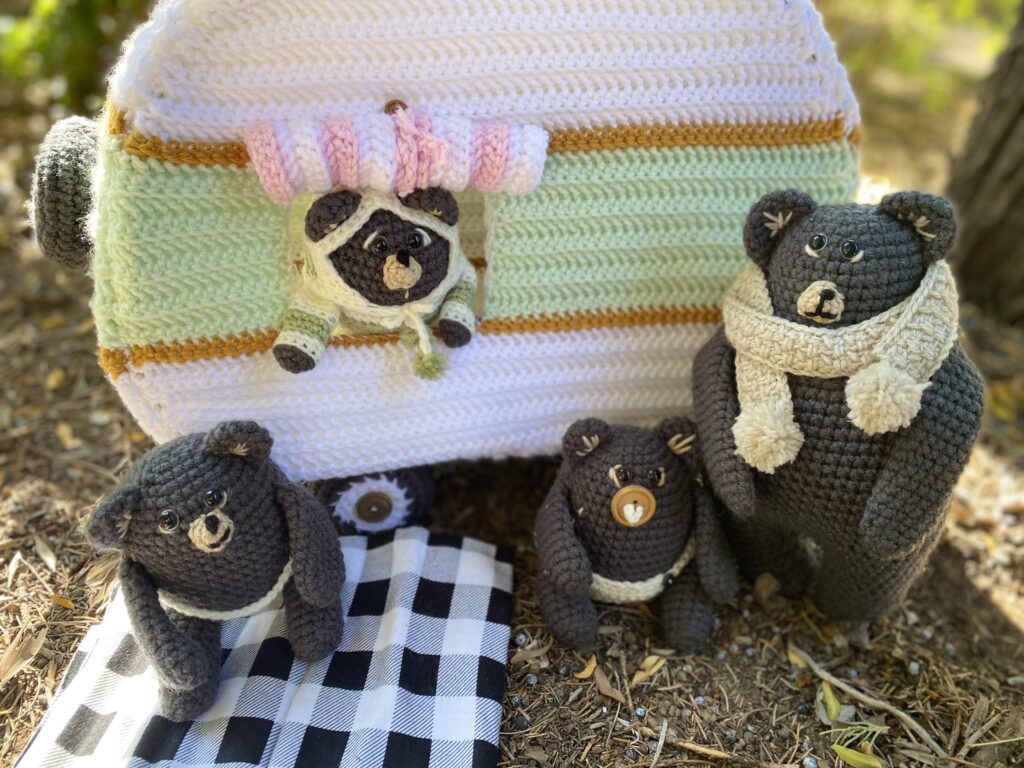
The Retro Camper is the bear family’s base camp. After a day of playing outside, they come back to cook their fish, gather berries, snuggle next to the campfire, and bundle up in their sleeping bags for an evening under the stars.
Retro Camper
Materials:
Redheart Super Saver yarn in White
Big Twist yarn in Mint
Big Twist yarn in Mustard
Size H8 5.00 mm Crochet hook
Polyester Fiberfill
Super Saver yarn in Carbon
6 one inch buttons
8, 1/4 inch small buttons
Pound of Love yarn in Pastel Pink
2+ yards of Pellon Ultra Firm rigid interfacing
Fiberfill for the wheels
Yarn needle
1 yard elastic cord
Needle and thread for stitching buttons in place
Finished Size:
11.5 w x 17.5 h inches x 5.5 d
Gauge: 15 stitches x 10 rows= 4”x4” square. Stitch used for gauge: HHDC Herringbone Half Double Crochet. Tutorial for HHDC found on my Helpful Tutorials page Here.
Abbreviations:
BLO: Work stitches in Back Loops Only
CH: Chain Stitch
HHDC: Herringbone Half Double Crochet
SC: Single Crochet
SK: Skip
Pattern notes:
This pattern makes a toy Retro Camper for the baby bears or for your other favorite amigurumi friends. This Camper might be the perfect gift for your little ones for birthdays, Christmas, or just because. To make the walls of the camper trailer, we will be making two panels for each side wall of the trailer and will be adding in stiff Pellon interfacing sandwiched between the crocheted panels to reinforce the shape. The front panel will fold down to allow for play inside the camper and can be opened or secured closed using buttons and elastic cord. Stationary wheels are then made and attached to the camper. Don’t forget the spare tire secured to the back:) Finally, you’ll finish up with making a door that will open and close and a window covering for the window. After that, it’s time to play!
Because of the buttons in this pattern, I recommend it for children over three. If making it for a younger child, consider modifying the buttons to use Velcro instead to avoid the risk of choking.
Also, it’s important to get the ultra firm Pellon for this pattern to reinforce the shape of the camper.
Pattern Instructions:
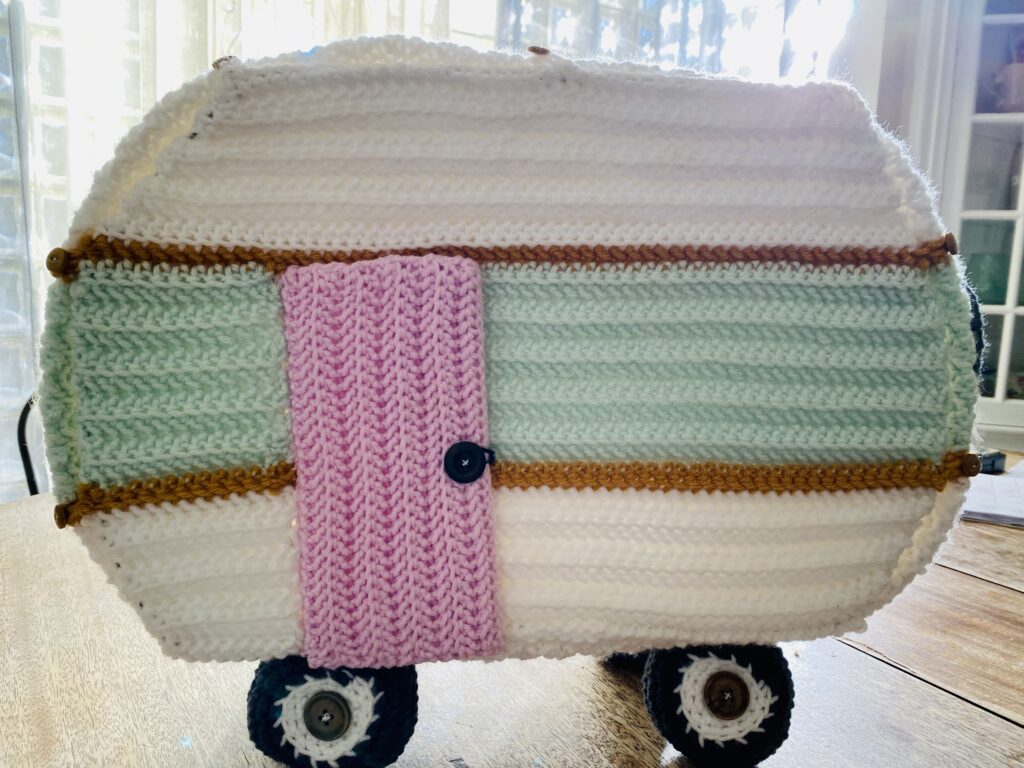
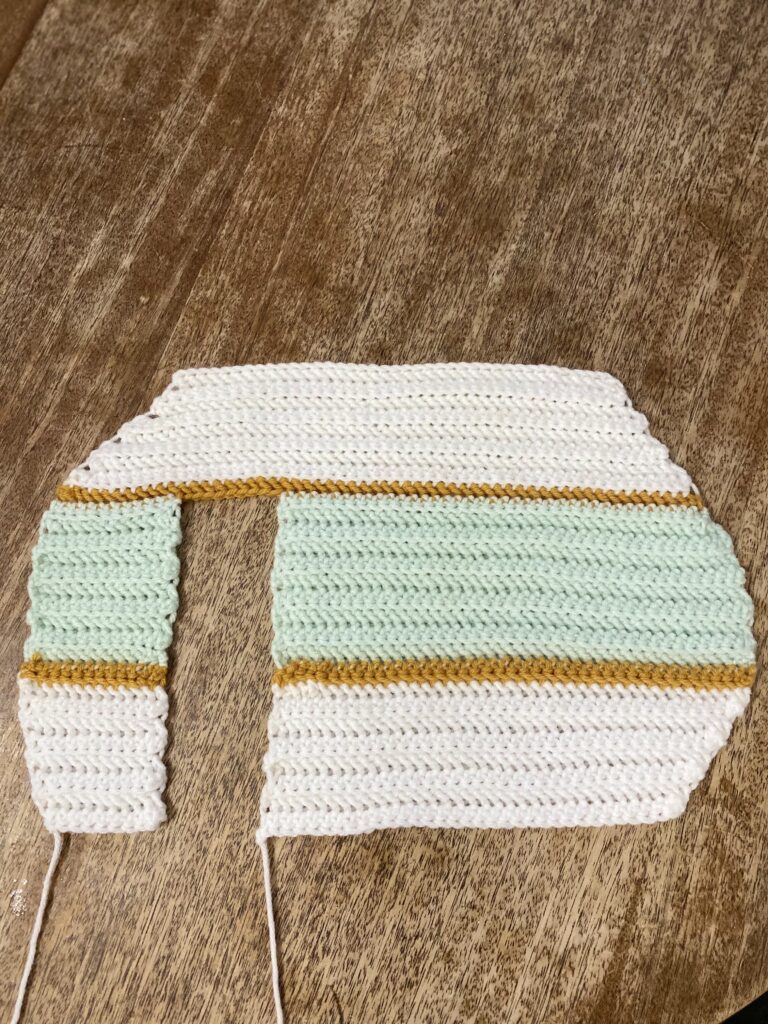
Panel A (make 2) This panel has the door.
Row 1: With White yarn, CH 41, turn.
For the next rows all stitches will be done in Back Loop Only, (BLO)to create a ribbed look for the camper.
Row 2: Herringbone Half Double Crochet in second ST from hook and in each remaining ST across. CH 1, turn. (40) If you are new to HHDC or if you’d like a quick refresher, visit my Helpful Tutorials Page here.
Row 3: 2 HHDC in the first ST, then HHDC in the next 38 ST. 2 HHDC in the last ST. CH 1, turn. (42)
Row 4: 2 HHDC in the first ST, HHDC in the next 40 ST, 2 HHDC in last ST. CH 1, turn. (44)
Row 5: 2 HHDC in the first ST, HHDC in the next 42 ST, 3 HHDC in the last ST. CH 1, turn. (47)
Row 6: 2 HHDC in the first ST, HHDC in the next 45 ST, 2 HHDC in the last ST. CH 1, turn. (49)
Row 7: 2 HHDC in the first ST, HHDC in the next 47 ST, 3 HHDC in the last ST. CH 1, turn. (52)
Row 8: 2 HHDC in the first ST, HHDC in the next 50 ST, 2 HHDC in last ST. CH 1, turn. (54)
Row 9: 2 HHDC in the first ST, HHDC in the next 52 ST, 3 HHDC in the last ST. CH 1, turn. (57) Color change to Mustard yarn.
Row 10: With Mustard colored yarn, 2 HHDC in the first ST, HHDC in the next 57 ST, 2 HHDC in the last ST. CH 1, Turn. (59) Color change to Mint yarn at the last pull through of the last stitch of the row.
Row 11: 2 HHDC in the first ST, HHDC in the next 37 ST. CH 1, turn. (39)
Row 12: HHDC in the next 38 ST. 2 HHDC in the last ST. CH 1, turn. (40)
Row 13: 2HhDC in the first ST, HHDC in the next 39 ST. CH 1, turn. (41)
Row 14- 20: HHDC in each ST across. CH 1, turn. (41)
Color change to Mustard at the last pull through of the last ST of row 20. CH 1, turn.
Row 21: HHDC in each ST across. Color change to White at the last pull through of the last ST of the row. Ch 1, turn. (41)
Row 22: HHDC in the next 39 ST. Decrease over the next 2 ST. CH 1, turn. (40)
Row 23: Decrease over the first 2 ST to make 1 Decrease ST. HHDC in the remaining 38 ST of the row. CH 1, turn. (39)
Row 24: HHDC in the next 37 ST. Decrease over the last 2 ST to make one Decrease ST. CH 1, turn. (38)
Row 25: Decrease over the next 2 ST to make 1 Decrease ST. HHDC in the remaining 36 ST. CH 1, turn. (37)
Row 26: HHDC in the next 35 ST, Decrease over the next two ST to make 1 Decrease. CH 1, turn. (36)
Row 27: Decrease over the next 2 ST to create 1 decrease ST. HHDC in the next 34 ST. CH1, turn. (35)
Row 28: HHDC in the next 33 ST, Decrease over the last 2 ST to make 1 Decrease. CH 1, turn. (34)
Row 29: Decrease over the first 2 ST to make 1 decrease. HHDC in the remaining 32 ST. CH 1, turn. (33) Fasten off and weave in ends.
Row 11 b: Count 12 stitches over from the end of the worked side of the Mustard stripe and attach mint yarn with a SLST in the back loop only. (See Picture) HHDC in each ST from this stitch to the end leaving the doorway section unworked. CH 1, turn. (12)
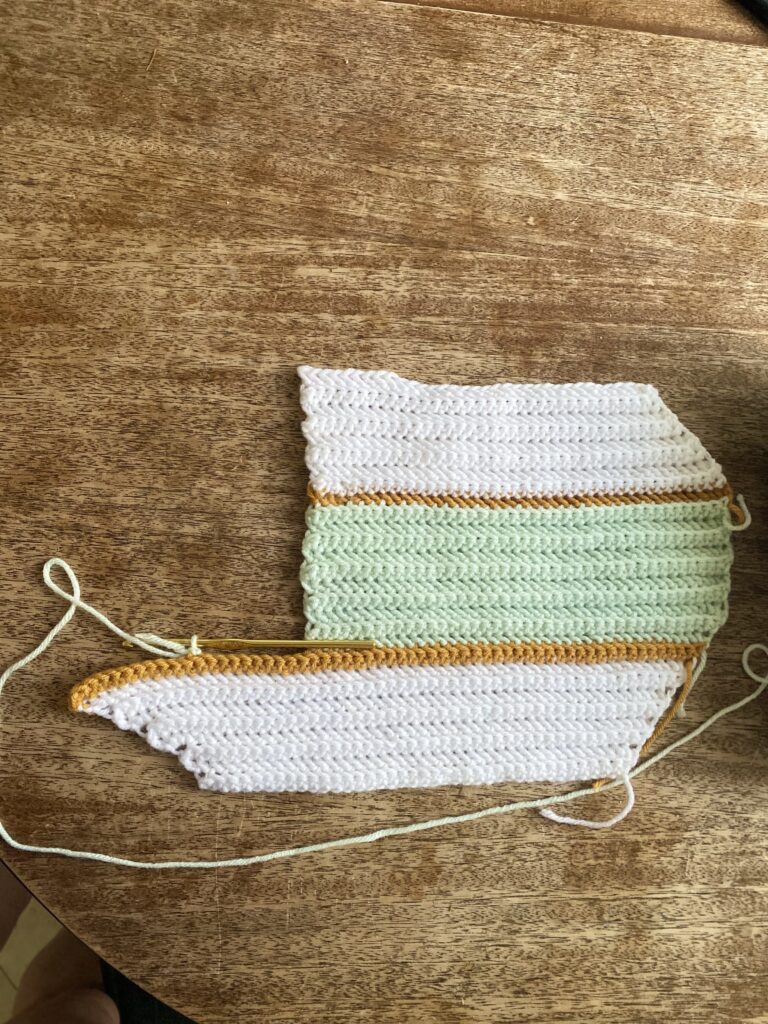
Row 12b: 2 HHDC in the first ST. HHDC in the remaining 11 ST. CH 1, turn. (13)
Row 13b- 20b: HHDC in each ST across. CH 1, turn. (13)
Color change to Mustard at the last pull through of the last ST of row 20b.
Row 21b: With Mustard yarn, HHDC in each ST across. Color change to White yarn at the last pill through of the last ST of the row. Ch 1, turn. (13)
Row 22b: With White yarn, HHDC in each ST across. CH1, turn. (13)
Row 23b: HHDC in the next 11 ST, Decrease over the last 2 ST to make 1 Decrease. CH , turn. (12)
Row 24b: HHDC in each ST across. CH 1, turn. (12)
Row 25b: HHDC in the next 10 ST. Decrease over the last 2 ST to make 1 Decrease. CH 1, turn. (11)
Row 26b: HHDC in each ST across. CH 1, turn. (11)
Row 27b: HHDC in the next 9 ST, decrease over the last 2 ST to make 1 decrease ST. CH 1, turn. (10)
Row 28b: HHDC in each ST across. CH 1, turn.(10)
Row 29b: HHDC in the next 8 ST, decrease over the last 2 ST to make 1 decrease ST. (9) Fasten off leaving a long tail for stitching. Weave in loose ends.
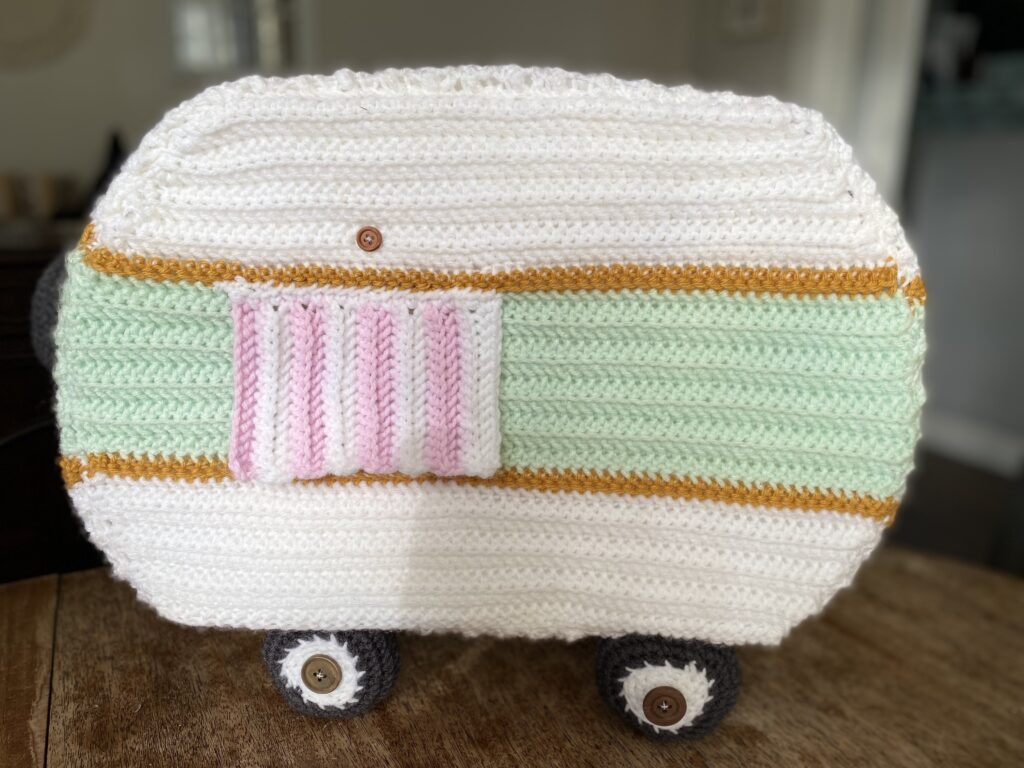
Panel B (make 2) This panel has the window.
Row 1: With White yarn, CH 41, turn. For remaining rows of the panel, all stitches will be completed in the Back Loop Only, (BLO)to create a ribbed look for the camper.
Row 2: Herringbone Half Double Crochet in second ST from hook and in each remaining ST across. CH 1, turn. (40) If you are new to HHDC or if you’d like a quick refresher, visit my Helpful Tutorials Page here.
Row 3: 2 HHDC in the first ST, then HHDC in the next 38 ST. 2 HHDC in the last ST. CH 1, turn. (42)
Row 4: 2 HHDC in the first ST, HHDC in the next 40 ST, 2 HHDC in last ST. CH 1, turn. (44)
Row 5: 2 HHDC in the first ST, HHDC in the next 42 ST, 3 HHDC in the last ST. CH 1, turn. (47)
Row 6:2 HHDC in the first ST, HHDC in the next 45 ST, 2 HHDC in the last ST. CH 1, turn. (49)
Row 7: 2 HHDC in the first ST, HHDC in the next 47 ST, 3 HHDC in the last ST. CH 1, turn. (52)
Row 8: 2 HHDC in the first ST, HHDC in the next 50 ST, 2 HHDC in last ST. CH 1, turn. (54)
Row 9: 2 HHDC in the first ST, HHDC in the next 52 ST, 3 HHDC in the last ST. CH 1, turn. (57) Color change to Mustard yarn.
Row 10: With Mustard colored yarn, 2 HHDC in the first ST, HHDC in the next 57 ST, 2 HHDC in the last ST. (59) Color change to Mint yarn at the last pull through of the last stitch of the row. CH 1, turn.
Row 11: With Mint yarn, 2 HHDC in the first ST, HHDC in the next 10 ST, CH 1, turn. (12)
Row 12: HHDC in the next 11 ST. 2 HHDC in the last ST of the row. CH 1, turn. (13)
Row 13: 2 HHDC in the first ST. HHDC in each of the remaining 12 ST across. CH 1, turn. (14)
Row 14-20: HHDC in each ST across. CH 1, turn. (14)
Fasten off, and weave in end.
Row 11b: Count 15 Stitches over from the top of the mint panel and attach mint yarn. (See picture.) HHDC in each of the remaining 33 ST across. CH 1, turn. (33)
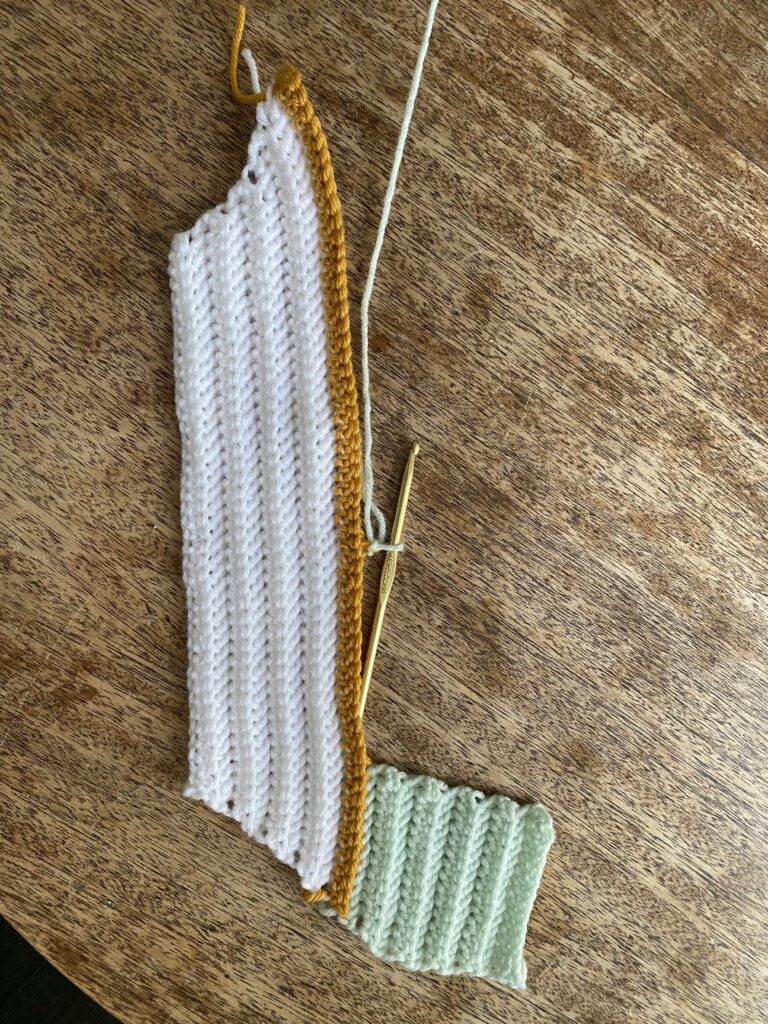
Row 12b: 2 HHDC in the first ST, HHDC in the next 32 ST. CH 1, turn. (34)
Row 13-20b: HHDC in each ST across. CH 1, turn. (34)
Fasten off and weave in ends.
Row 21: With Mustard yarn, attach the yarn with a SL ST to the bottom corner of row 20b. HHDC in the next 34 ST. CH 15. Leaving a gap for the window, attach yarn with a HHDC in the bottom of Row 20. HHDC in the remaining 13 ST, color change to white at the last pull through of the last ST of the row. CH 1, turn. (48)
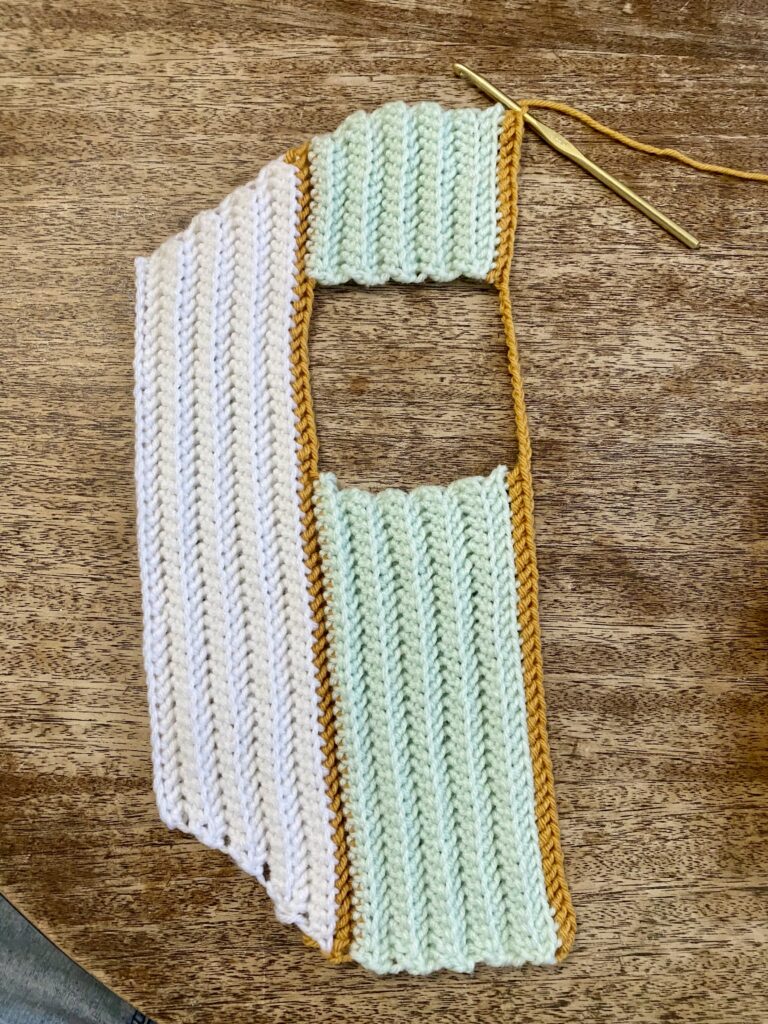
Row 22: Decrease over the first 2 ST to make 1 Decrease ST. HHDC in the next 59 ST, including the CH stitches. Decrease over the last 2 ST of the row to make 1 Decrease ST. CH 1, turn. (61)
Row 23: Decrease over the first 2 ST to make 1 Decrease ST. HHDC in the next 57 ST. Decrease over the last 2 ST of the row to make 1 Decrease ST. CH 1, turn. (59)
Row 24: Decrease over the first 2 ST to make 1 Decrease ST. HHDC in the next 55 ST. Decrease over the last 2 ST of the row to make 1 Decrease ST. CH 1, turn. (57)
Row 25: Decrease over the first 2 ST to make 1 Decrease ST. HHDC in the next 53 ST. Decrease over the last 2 ST to make 1 ST. CH 1, turn. (55)
Row 26: Decrease over the first 2 ST to make 1 Decrease ST. HHDC in the next 51 ST. Decrease over the last 2 ST to make 1 Decrease ST. CH 1, turn. (53)
Row 27: Decrease over the first 2 ST to make 1 Decrease ST. HHDC in the next 49 ST. Decrease over the last 2 ST of the row to make 1 Decrease ST. CH 1, turn. (51)
Row 28: Decrease over the first 2 ST to make 1 Decrease. HHDC in the next 47 ST. Decrease over the last 2 ST of the row to make 1 Decrease ST. CH 1, turn. (49)
Row 29: Decrease over the first 2 ST to make 1 Decrease ST. HHDC in the next 45 ST. Decrease over the last 2 ST of the row to make 1 Decreasd ST. CH 1, turn. (47)
Lay one of the Panel A panels on the Pellon interfacing. Using a marking pen or chalk, outline Panel A on the interfacing. Set the crocheted panel aside and cut out the interfacing panel. Repeat with Panel B.
Sandwich the Panel A interfacing piece between both crocheted Panel A pieces. Align the edges and stitch around the open edges all the way around.
Repeat by sandwiching Panel B interfacing between the panel B crocheted pieces and stitch around edges.
Side Panel (make 1)
This panel will be crocheted and then folded in half across the length with an interfacing panel sandwiched between the fold. This panel will then be stitched around the edges of panel B to create the walls of the Camper. Let’s get started.
Row 1: With Mustard yarn. CH 41, turn. (41)
For the next row and all remaining rows of the panel, stitches will be worked in BLO.
Row 2: HHDC in second stitch from the hook and in each remaining ST across. CH 1, turn. (40) Color change to White yarn at the last pull through of the last ST of the row.
Row 3-45: With White yarn, HHDC in each ST across. CH 1, turn. (40)
Color change to Mustard at the last pull through of the last stitch of row 45.
Row 46: With Mustard, HHDC in each ST across. Color change to Mint at the last pull through of the last ST of the row. (40) Ch 1, turn.
Row 47- 57: With Mint, HHDC in each ST across. CH 1, turn. (40)
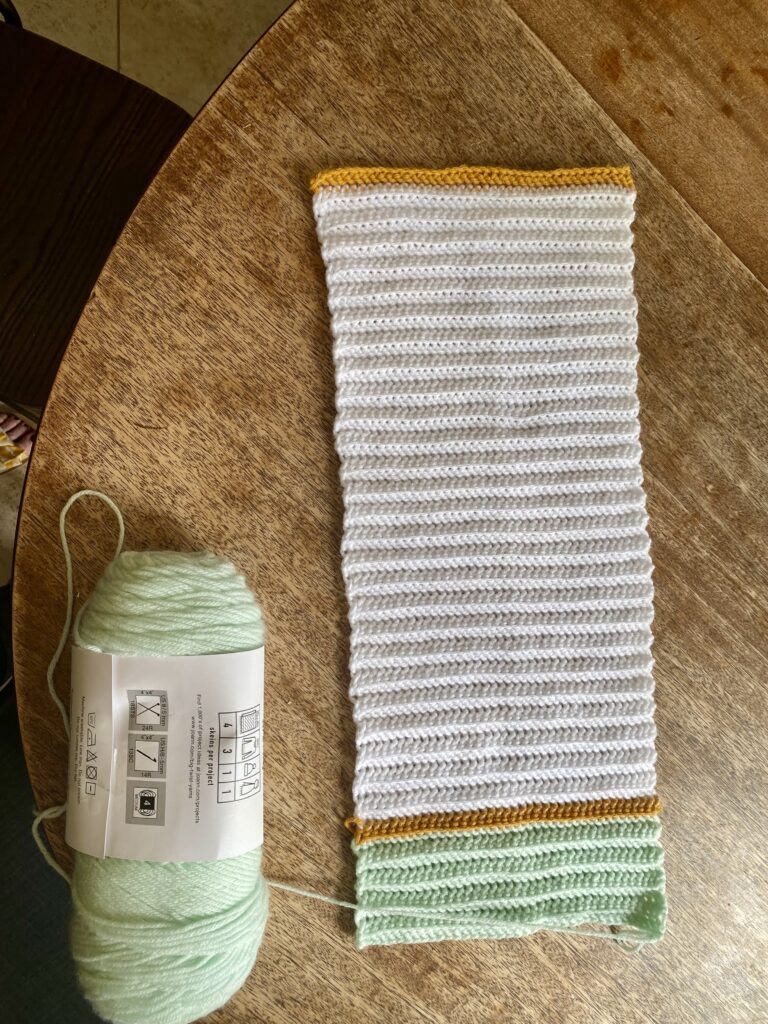
Color change to Mustard at the last pull through of the last ST of Row 55. CH 1, turn.
Row 58: With Mustard, HHDC in each ST across, color change to White at the last pull through of the last ST of the row. CH 1, turn. (40)
Row 59-101: With White, HHDC in each ST across. CH 1, turn. (40)
Color change to Mustard yarn at the last pull through of the last ST of Row 100. CH 1, turn.
Row 102: With Mustard yarn, HHDC in each ST across. Color change to Mint at the last pull through of the last ST of the row. CH 1, turn. (40)
Row 103-113: With Mint yarn, HHDC in each ST across. CH 1, turn. (40)
Fasten off, leaving a long tail for stitching. Weave in all free ends of the panel except for the one for stitching.
Cut 3, 5 inch x 20 inch wide strips of Pellon. Stitch the strips together into a long strips. Fold the crocheted side panel in half along its length. Set the strip of the Pellon sandwiched inside the fold of the side panel and stitch the free ends of the side panel, aligning the free edges as you stitch along the length.
Bring together the open seam of the panel and stitch it closed.
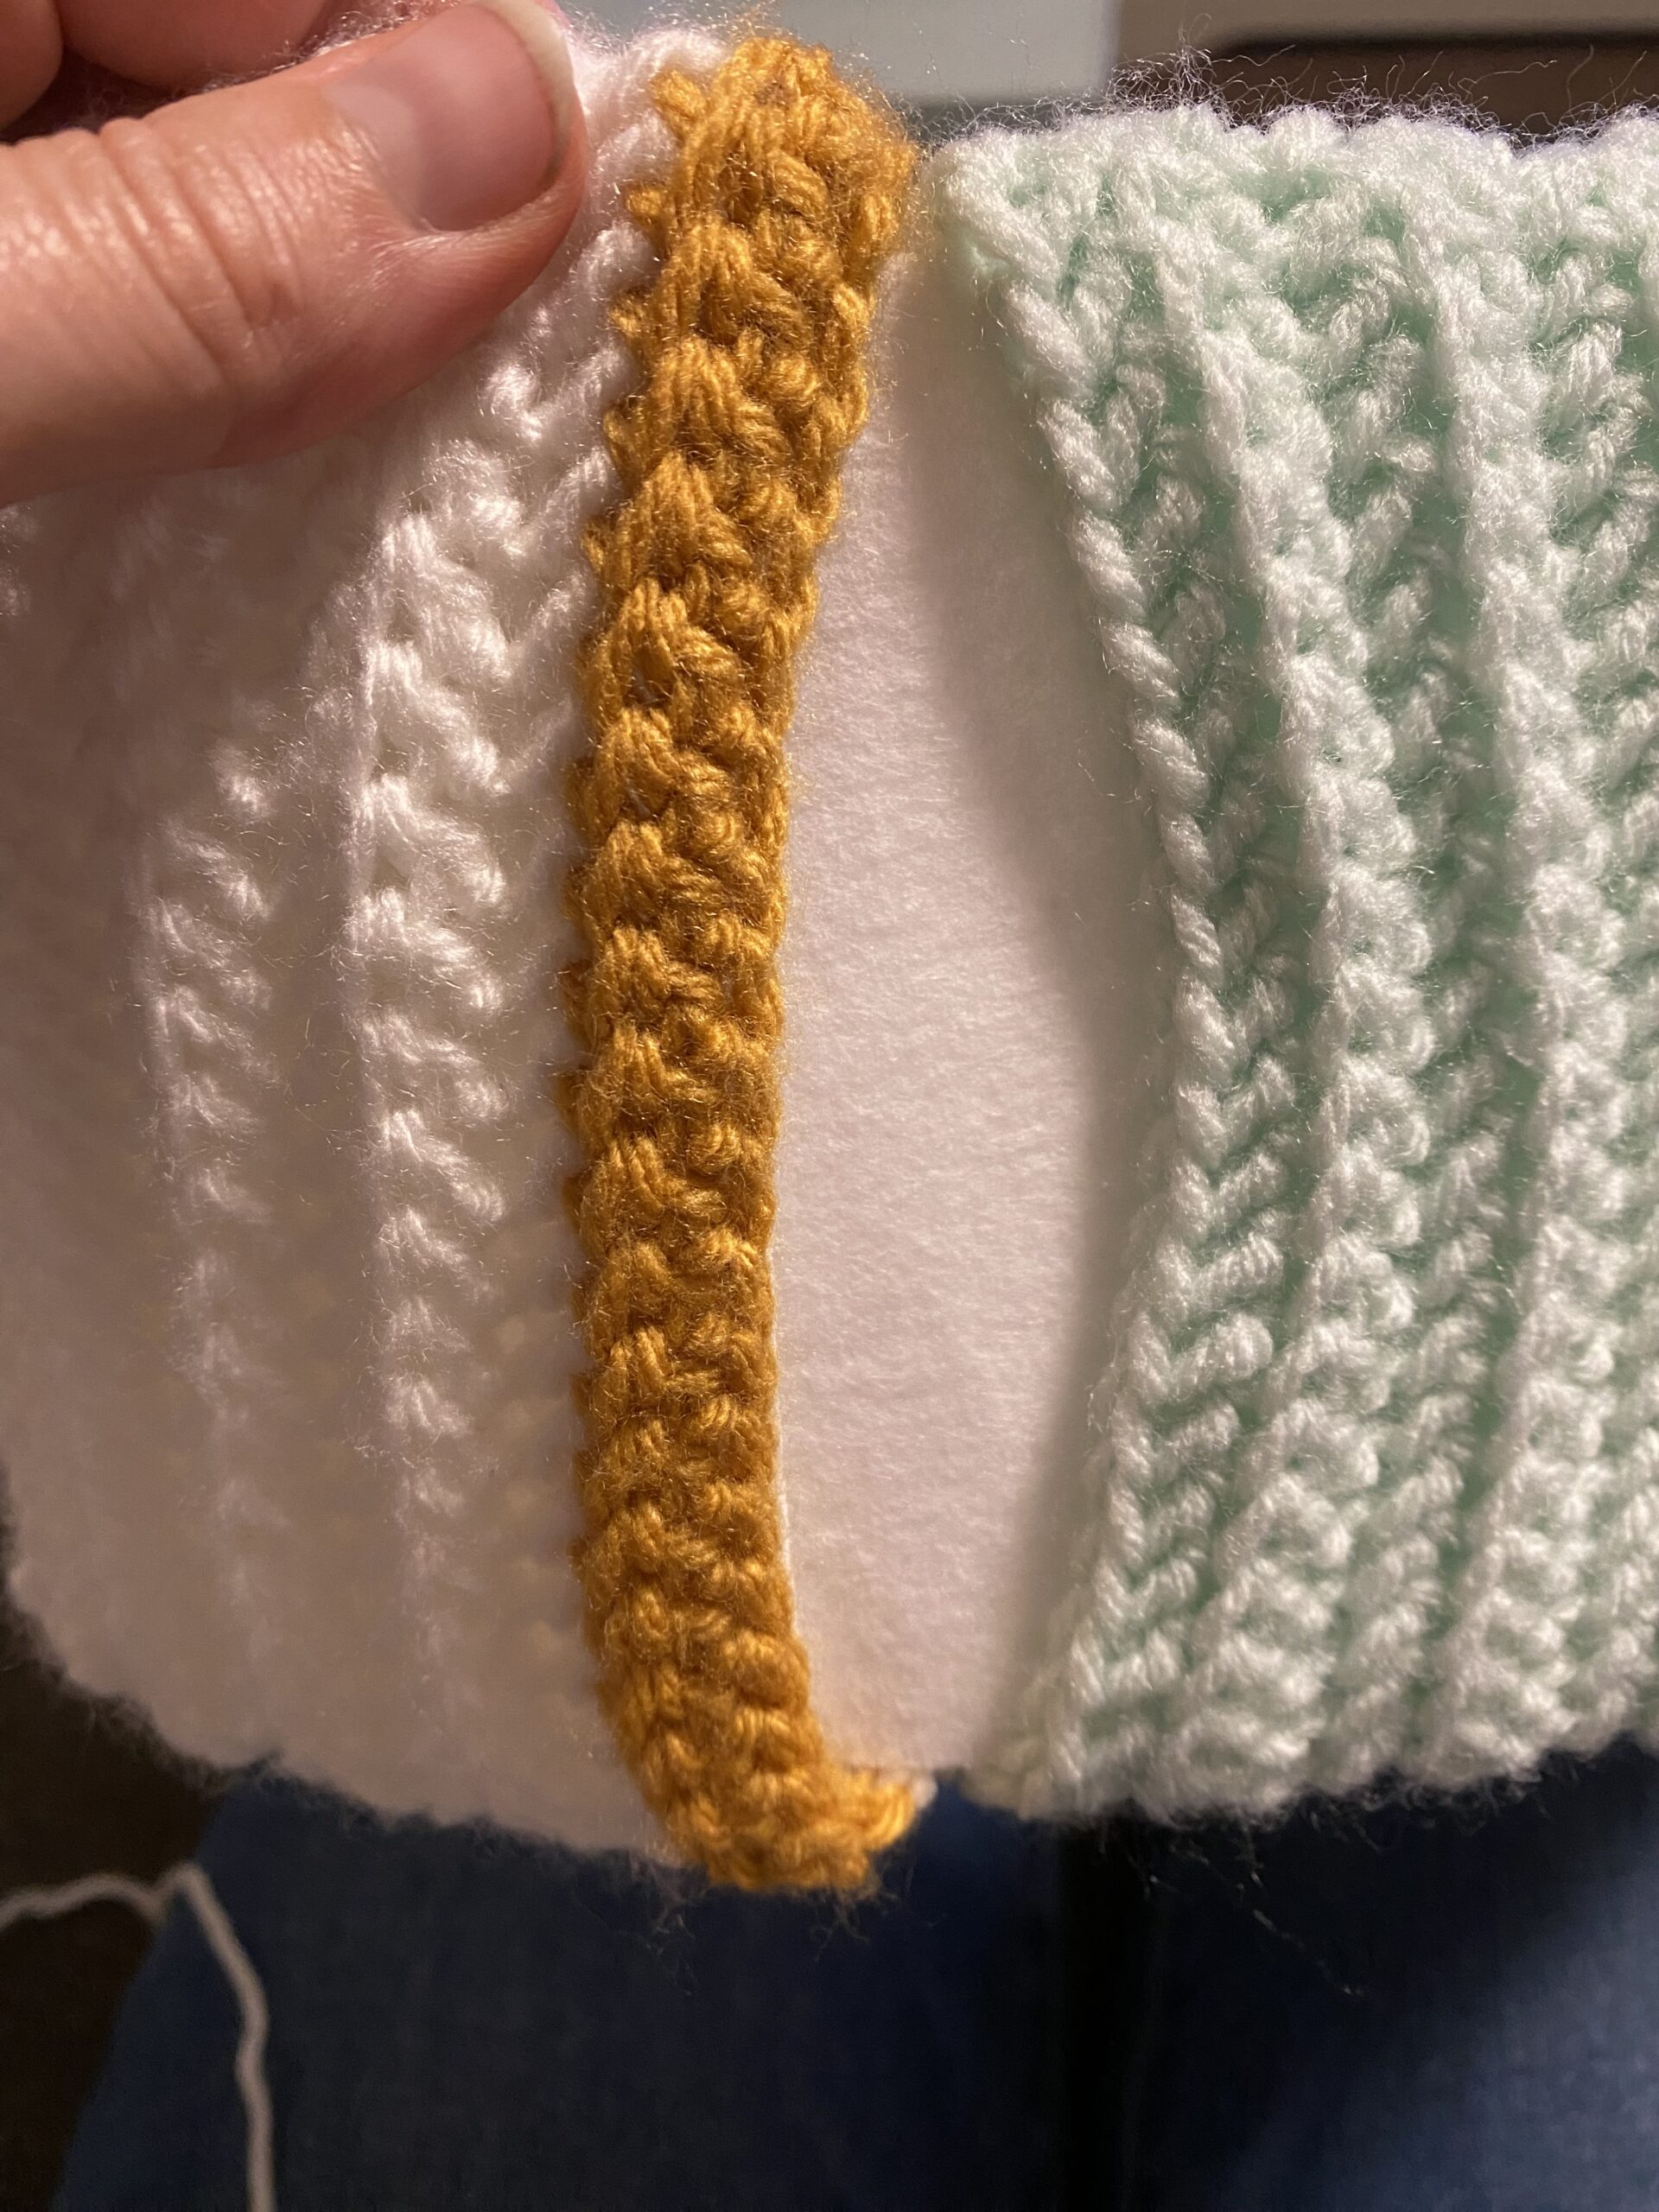
Now align the door panel in place, matching the color blocking and color change lines. Stitch the bottom seam to the wall panel of the Camper van so that the door panel can open and close by folding the top down.
Wheels (Make 5 to include a spare)
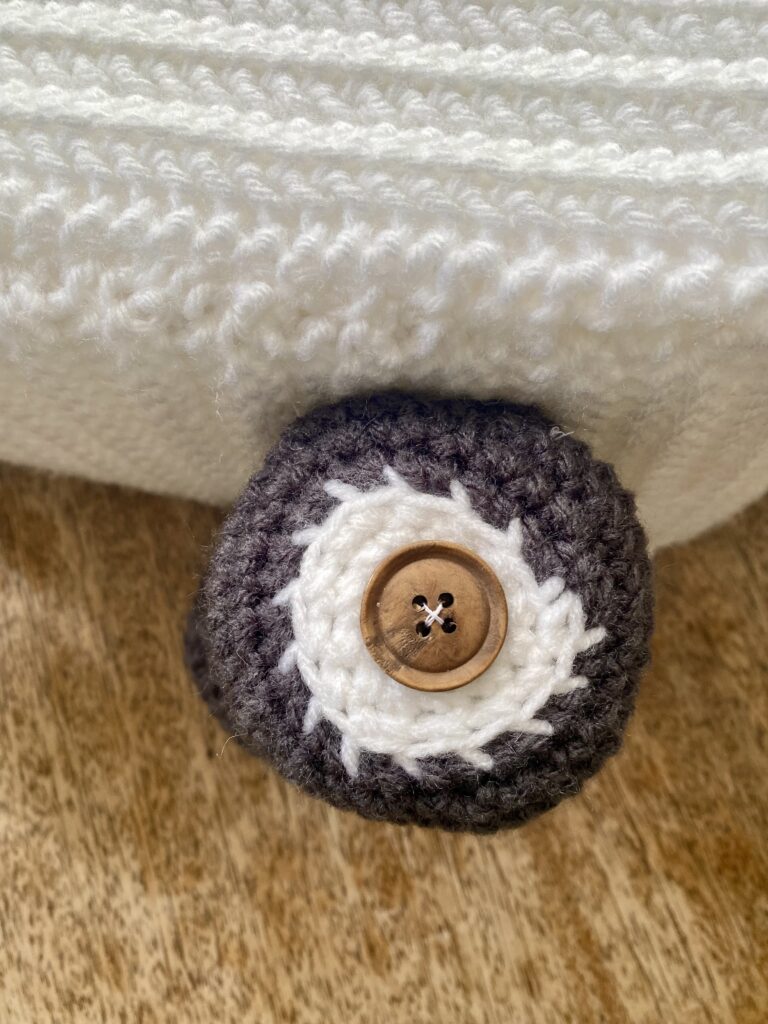
Now we will make 5 tires.
Tires:
Rnd 1: With White yarn, 6 SC in a magic loop. Pull the free end snuggly to close the loop. (6)
Rnd 2: *SC in the next ST, 2 SC in the next ST** Repeat from * to ** around. (9)
Rnd 3: *SC in the next 2 ST, 2 SC in the next ST.** Repeat from * to ** around.( 12)
Rnd 4: *SC in the next 3 ST, 2 SC in the next ST. Repeat from * to ** around. (15) Color change to Gray on the last pull through of the last ST of the round.
Rnd 5: With Gray yarn, in BLO, 2 SC in each ST around. (30)
Rnd 6: *SC in the next ST, 2 SC in the next ST.** Repeat from * to ** around. (45)
Rnd 7-8: SC in each ST around. (45)
Rnd 9: *SC in the next ST, Decrease over the next 2 ST to form 1 decrease ST. ** Repeat from * to ** around. (30)
Rnd 10: *SC in the next 3 ST, Decrease over the next 2 ST to form 1 decrease ST. ** Repeat from * to ** around. (24)
Rnd 11: *Decrease over the next 2 ST to form 1 decrease ST. ** Repeat from * to ** around. (12)
Rnd 12:*SC in the next 2 ST, Decrease over the next 2 ST to for 1 Decrease ST.** Repeat from * to ** around. (9)
Stuff the tire firmly with fiberfill.
Rnd 13: *Decrease over the next 2 ST to make 1 decrease ST.** Repeat from * to ** around. (6)
Fasten off, leaving a long tail for Stitching. Using a yarn needle and the long tail, weave the yarn through the back loop only of each of the 6 ST of the round. Pull the yarn snuggly to close the loop and fasten in place. Weave in ends.
Stitch a Wooden button to the center of the wheel as a hubcap if desired.
Cabin Door: (make 1)
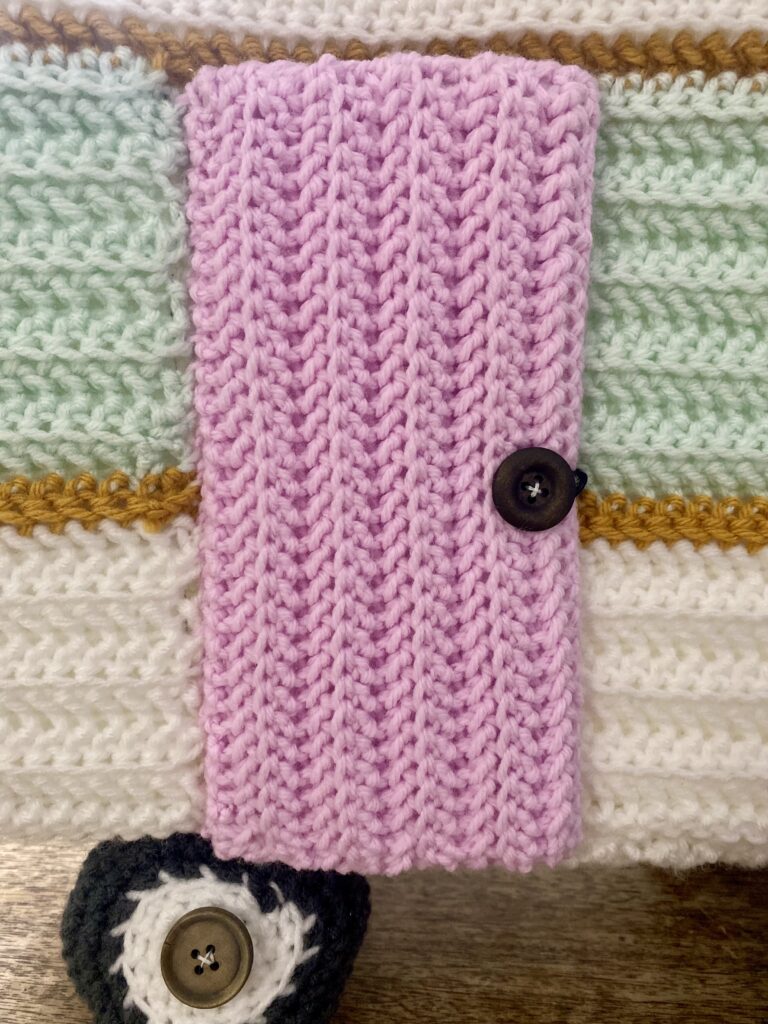
Row 1: Ch 31, turn. (26)
Row 2: HHDC in second ST from the hook and in each remaining ST across. CH 1, turn. (30)
Row 2-20: HHDC in BLO of each ST across. CH 1, turn. (30) Fasten off, leaving a long tail for stitching.
Cut a piece of ultra firm Pellon 3?x9? Inches.
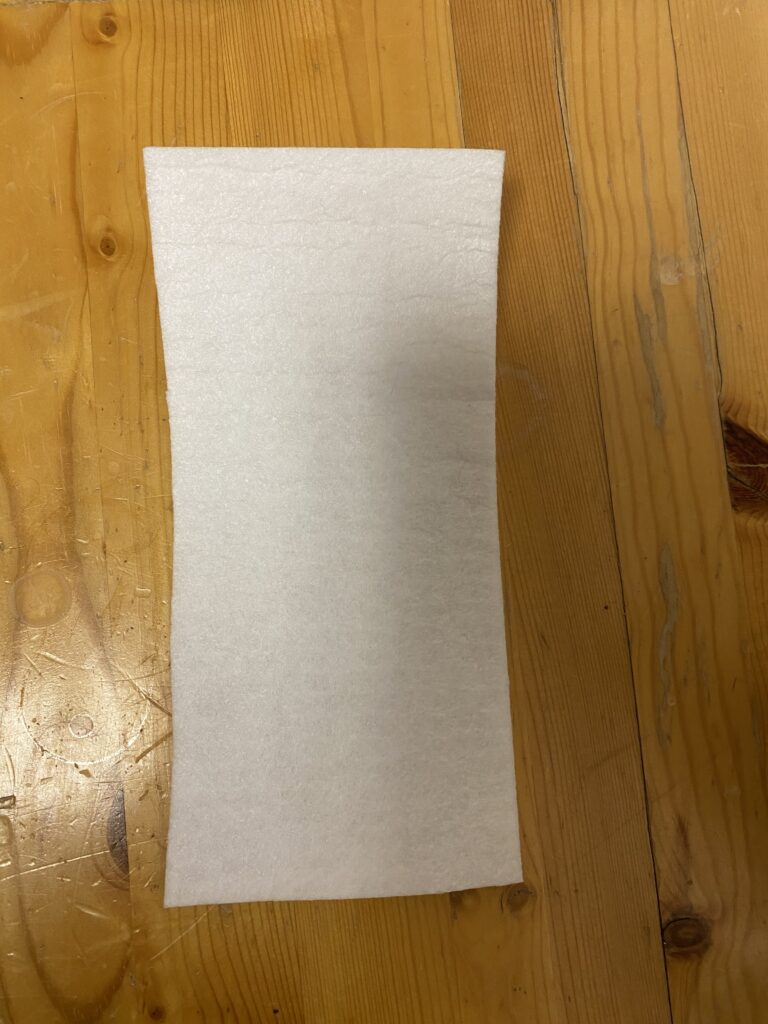
Fold the crocheted cabin door piece in half with the Pellon piece sandwiched between the folds. Using the yarn tail for stitching, stitch around the edges of the door, aligning the edges.
Stitch one side of the door to one side of the doorway opening on the Camper van. You can choose which side you’d like to stitch it to depending on which side you’d like the door to open.
Stitch a button in place on the door as a doorknob. Tie a 3 inch piece of elastic cord into a loop. Stitch the loop in place on the camper in line with the doorknob. Be sure to stitch the elastic to the Pellon so the elastic will be able to hold the door closed when the elastic is looped around the button.
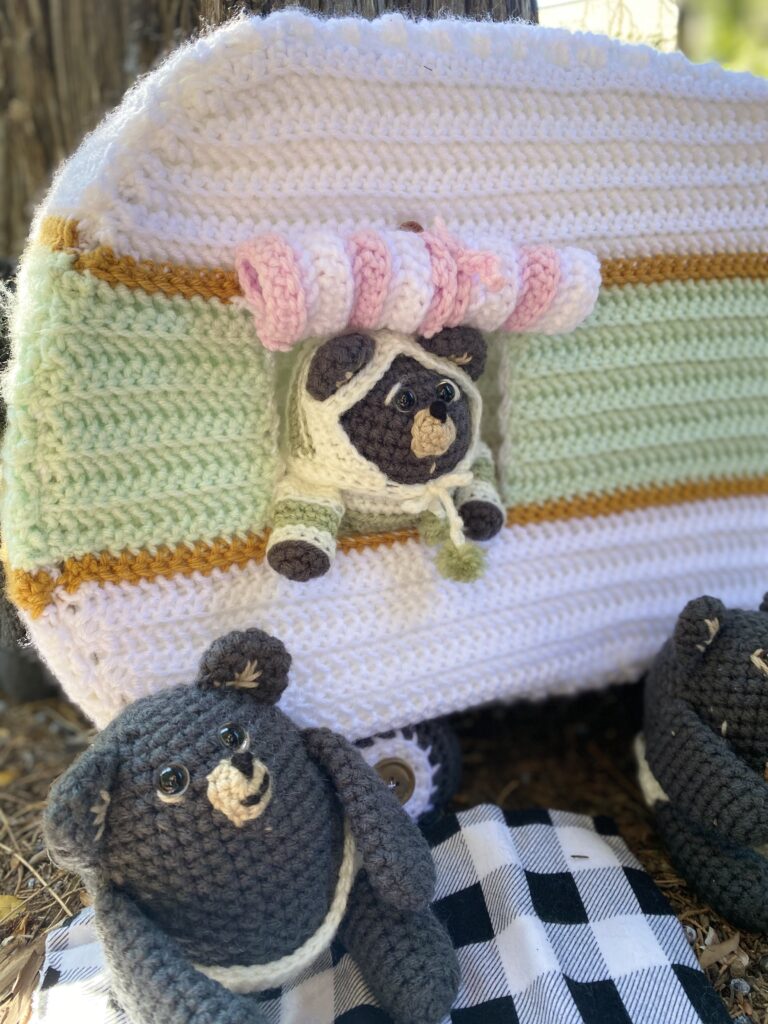
Window Cover: (Make one)
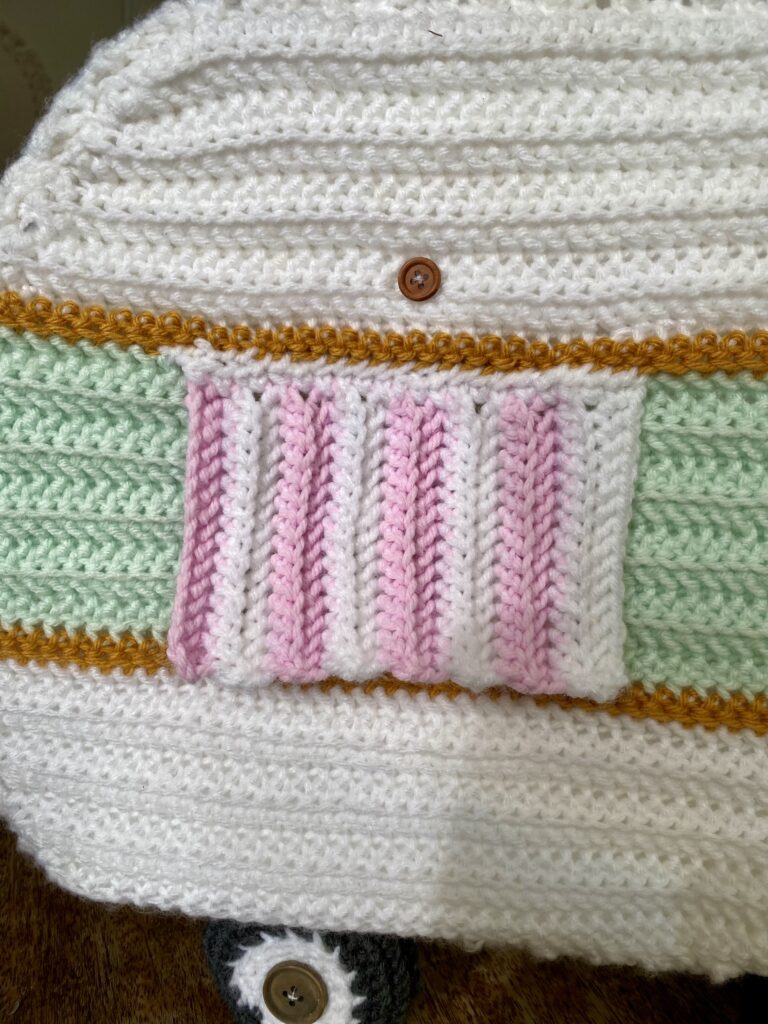
Row 1: With pink yarn CH 16, turn. (16)
Row 2: HHDC in the second ch from the hook and in each ST across. Color change to White at the last pull through of the last ST of the row. Don’t fasten off pink. CH 1, turn. (15)
Row 3: In Back Loops only, HHDC in each ST across. CH 1, turn. (15)
Row 4: In BLO, HHDC in each ST across. Color Change to Pink at the last pull through of the last ST of the row leaving white attached at the back of the work. CH 1, turn. (15)
Row 5: With Pink yarn, repeat row 3. (15)
Row 6: With pink yarn, repeat Row 4, color changing to White at the last pull through of the last ST of the round. (15)
Row 7: Repeat row 3. (15)
Row 8: Repeat row 4. (15)
Row 9: Repeat row 5. (15)
Row 10: Repeat row 6. (15)
Row 11: Repeat row 3. (15)
Row 12: Repeat row 4. (15)
Row 13: Repeat row 5. (15)
Row 14: Repeat row 6. (15)
Row 15: Repeat row 3. (15)
Row 16: Repeat row 4. (15)
Without fastening off, SC across the top of the panel by making a SC in the end of each row as you work your way across. (18) Fasten off, leaving a long tail for stitching.
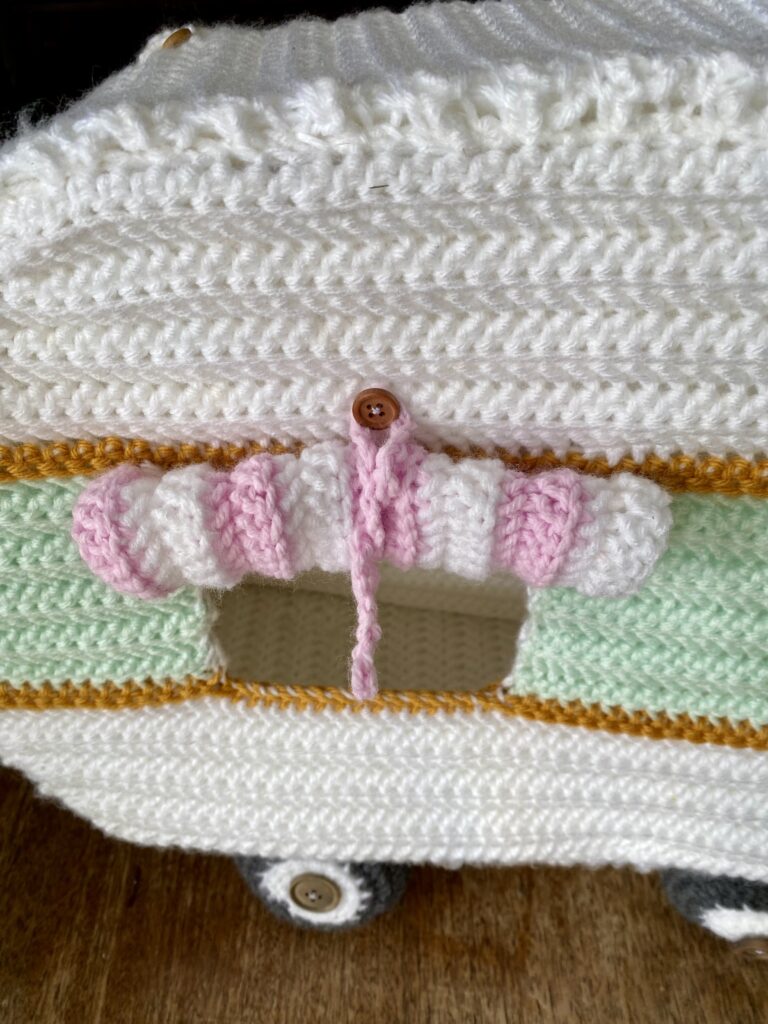
Using the long tail, stitch the window cover in place at the top of the window, leaving the sides and the bottom free.
To crochet a tie to anchor the window cover in a rolled up position, Chain 30 in pink yarn. Fasten off and attach to the inside upper center of the window border. Stitch a button centered above the window. Roll up the window cover and wrap the chain around the button to secure the window cover in place.
Copyright
This pattern and its images are copyright protected and the sole property of Abby Holmgren.
Please do not redistribute, transfer, or sell the pattern, or alter it to claim as your own. You may sell any products you create from this pattern. Please credit the designer by linking online listings to briarberryfarmhouse.com.
