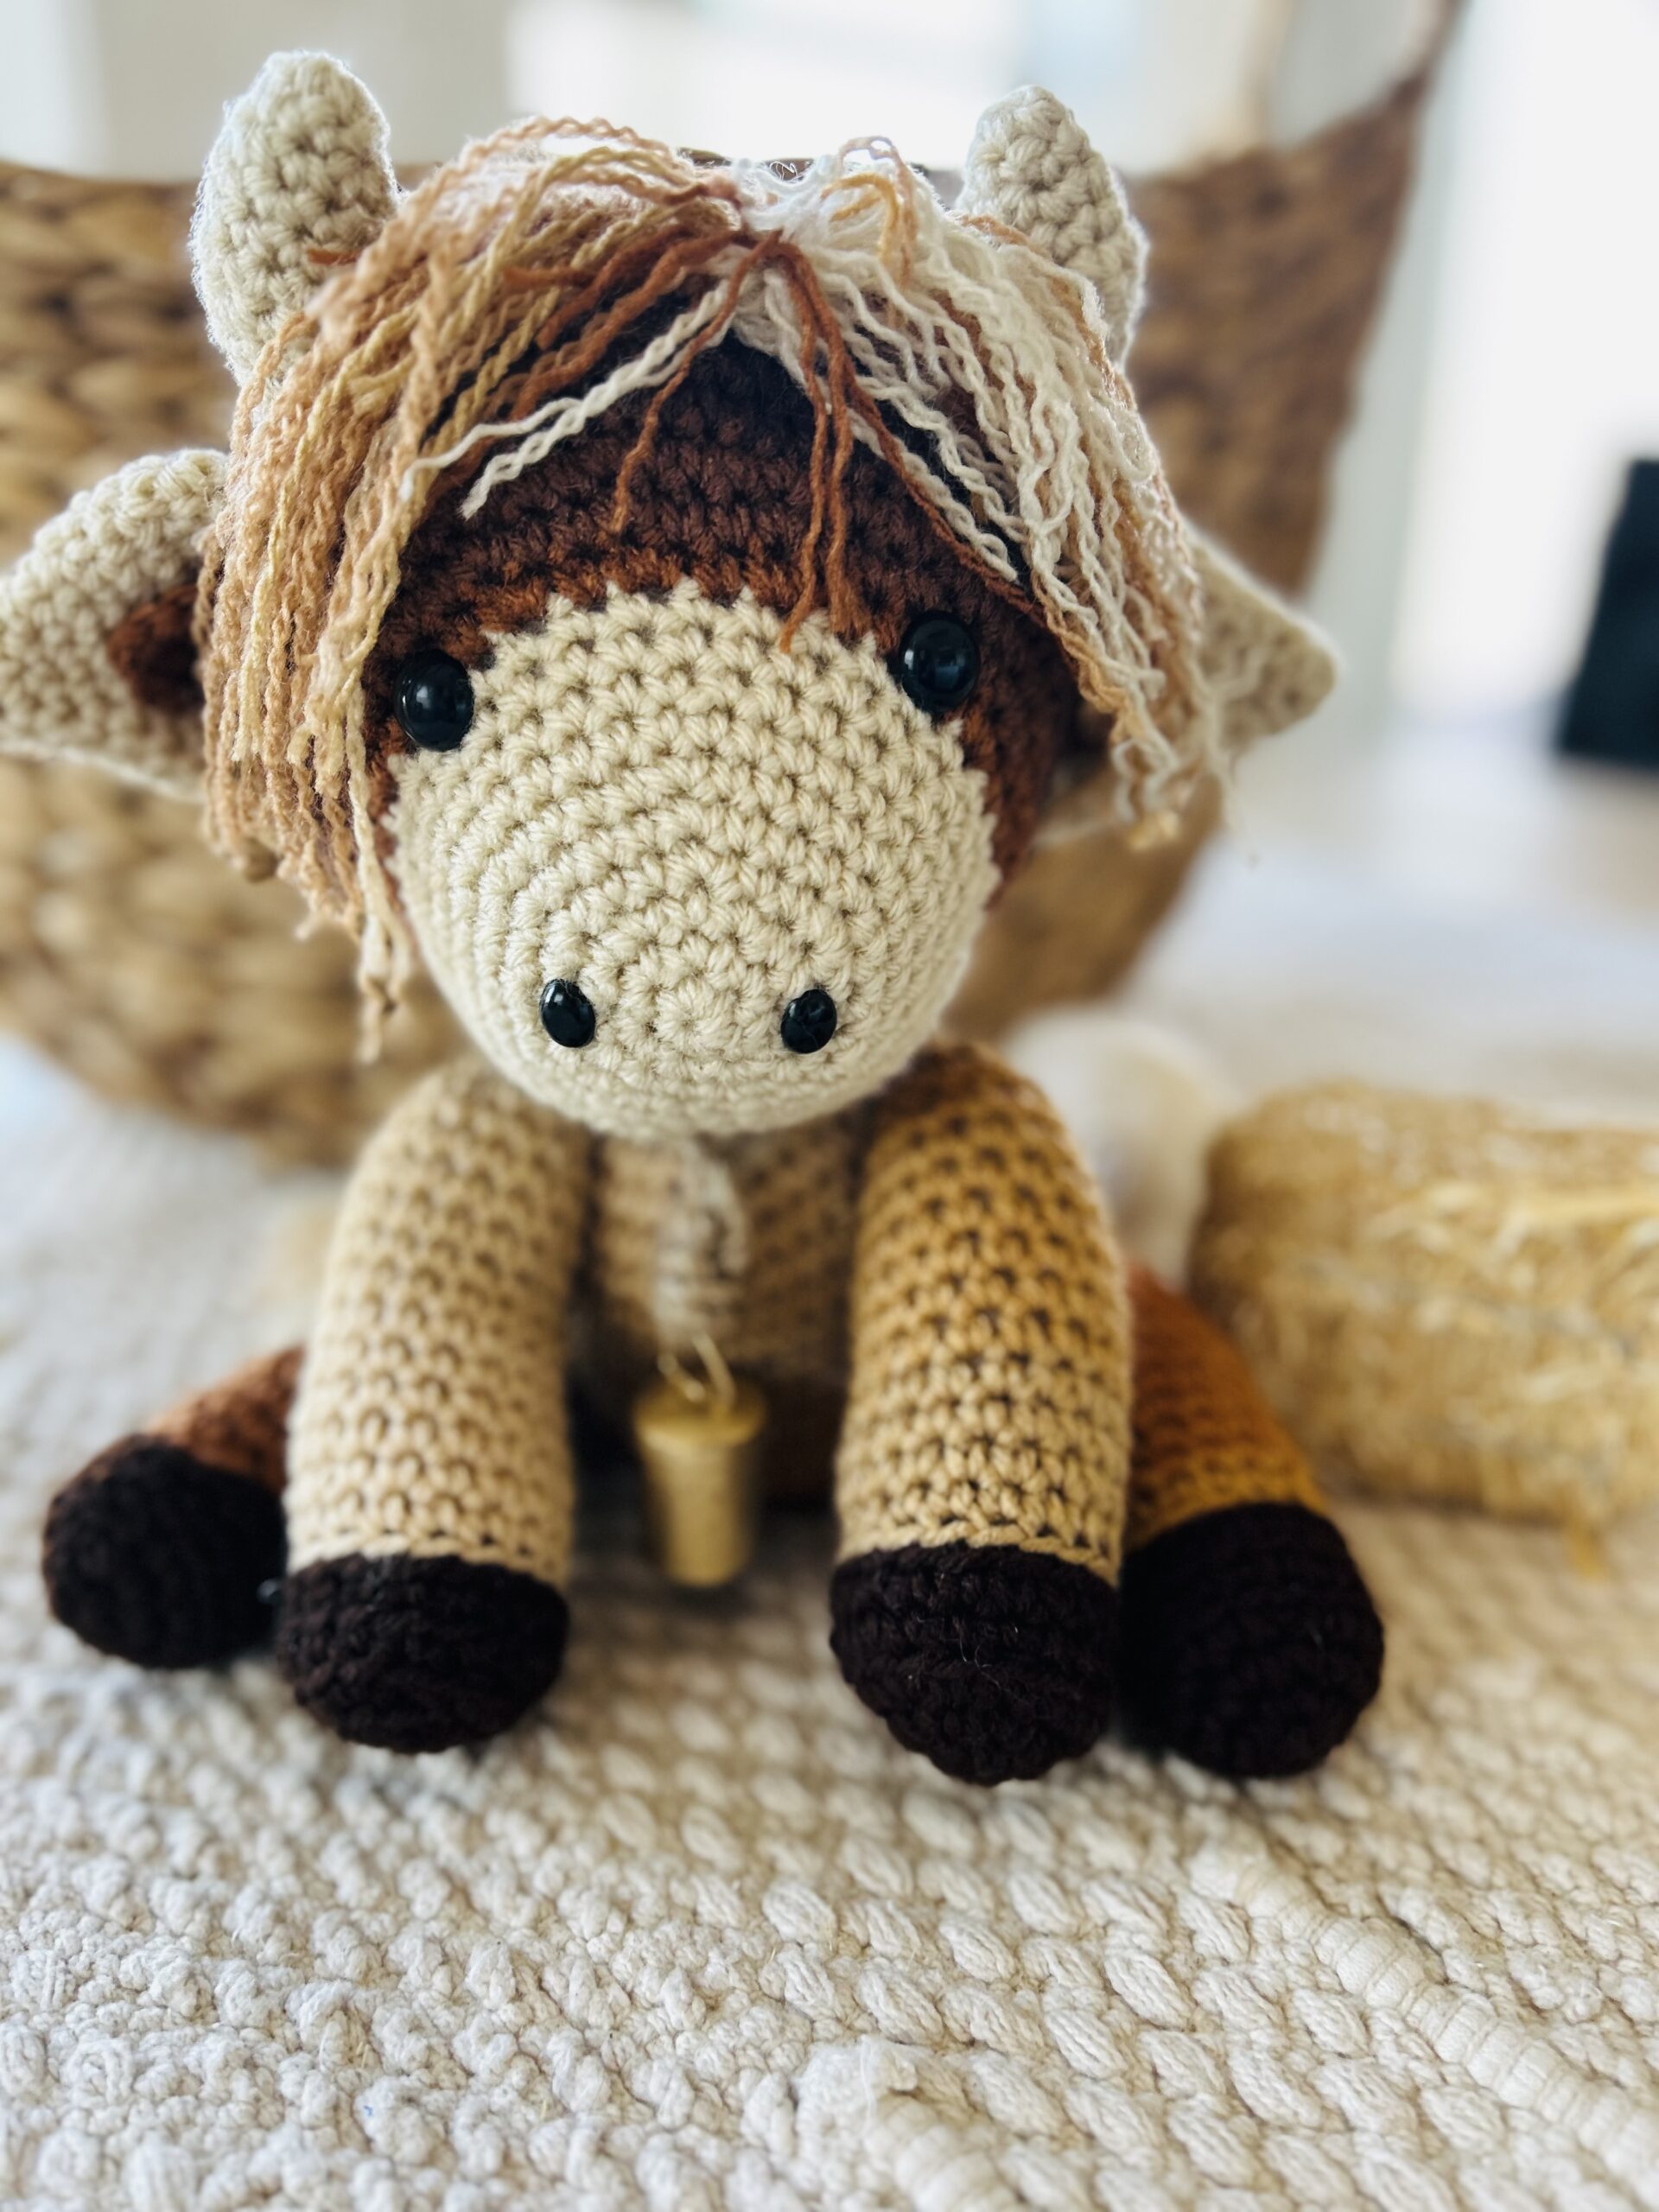
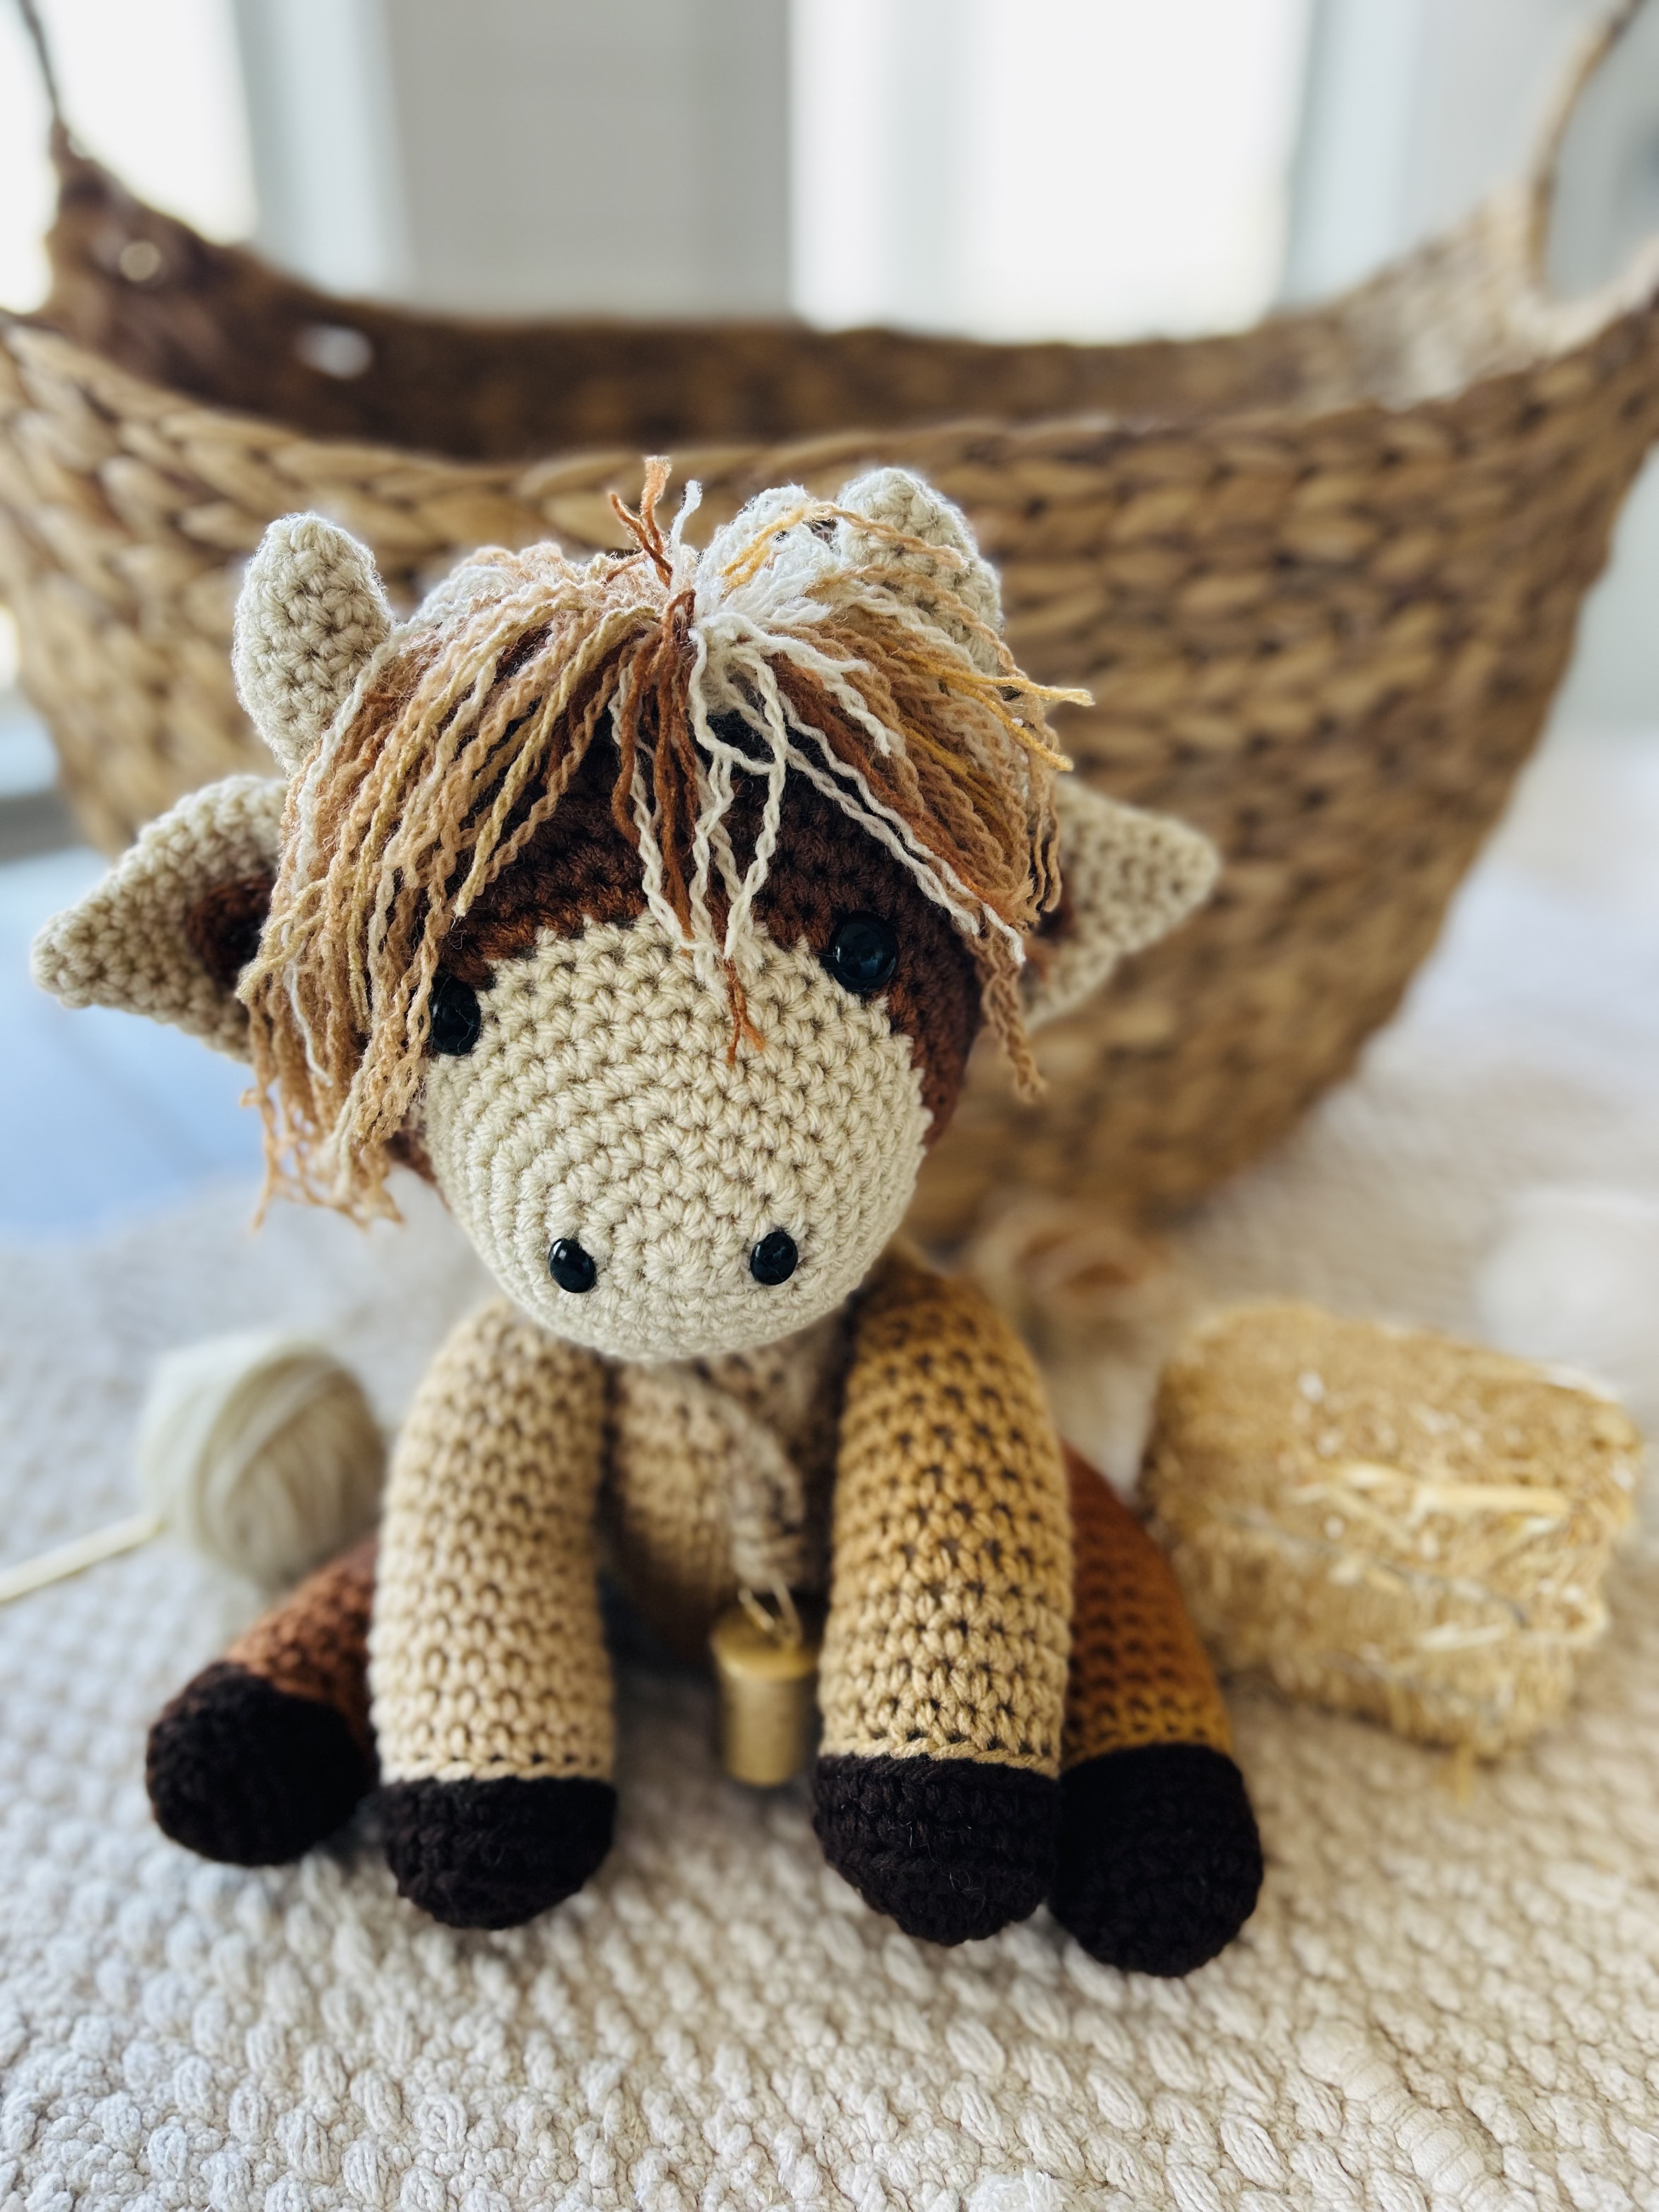
Hyacinth the Highland Cow Crochet Pattern
Did you know that the Scottish Highland Cows are one of the oldest breeds of cows known in the world, with the breed dating back to the 16th century. Because of their thick glossy double coats they are able to thrive in harsh lands that other cattle can’t. Their long eyelashes and hair help to protect them from extreme weather and they show their affection by licking each other and play fighting.
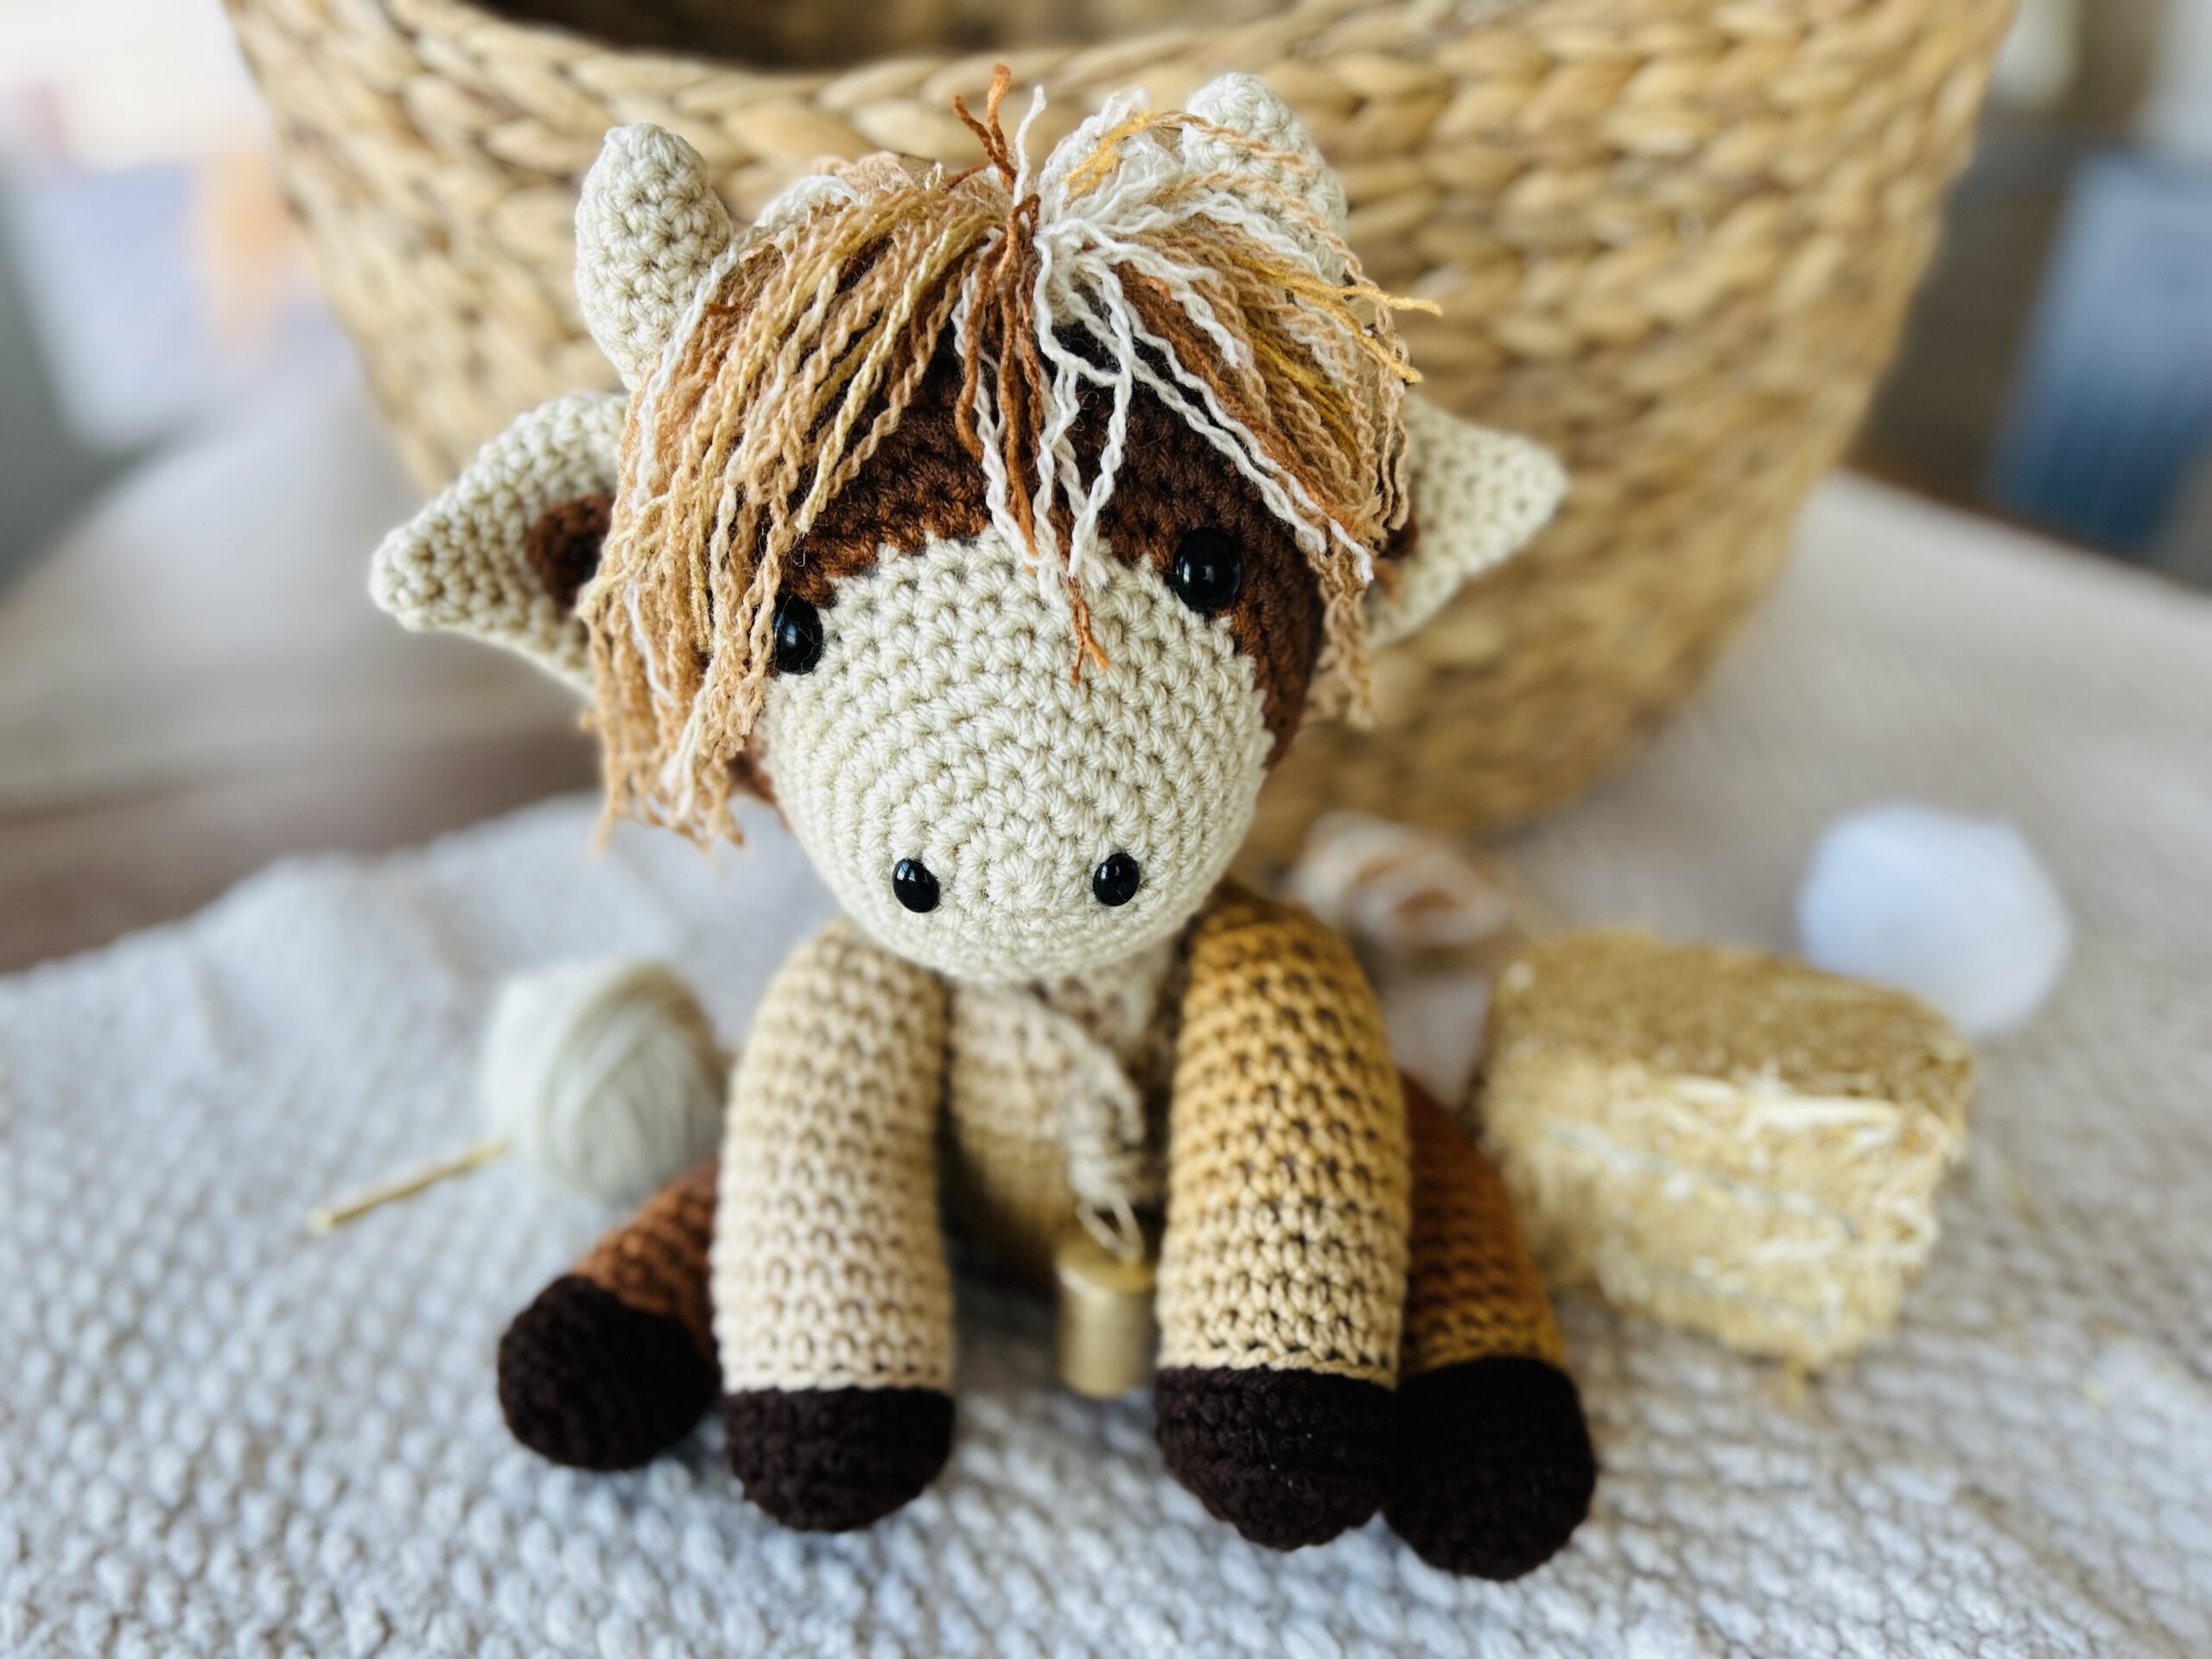
Meet baby Hyacinth, the Highland Cow. She’s ready to graze and explore on her wobbly legs. She’s full of curiosity and cuddles. Her horns have just begun to start to grow but she already has a pretty mane and tail. She’ll be the perfect friend for cow lovers and she’s easy to crochet for beginners and intermediate crochet artists. I hope you’ll enjoy this pattern and the fun playtimes ahead with your little ones.
Hyacinth the Highland Cow Pattern
Materials:
Red Heart Super Saver yarn in Aran
Red Heart yarn in Latte Stripe (This will make a multicolored cow. Substitute for a color of your choice if you would like less color variation.)
Red Heart Yarn in Dark Brown
Size F crochet hook
Large Amigurumi Safety Eyes
2 Amigurumi Safety Noses. or black yarn for embroidering the nose
Fiberfill
Gauge:
8 Stitches X 7 Rows = 2 inch Square.
Pattern used for gauge: SC
Size:
Completed Size: 9″ X 6″
Abbreviations:
BLO- Back Loop Only
CH – Chain Stitch
SC- Single Crochet
FSC – Foundation Single Crochet
HDC – Half-double Crochet
DC – Double Crochet
SLST – Slip Stitch
ST(S) – Stitch(es)
SK – Skip
Pattern Notes: This pattern begins with making the head of the Cow, including adding the details of the eyes and nose. The Ears and Horns will be crocheted separately and attached to the head. After completion of the head, the Body will be crocheted and attached to the head, followed by the legs and tail. After attaching the legs and tail, the mane of the head and tail will be completed.
Special Stitches: We will be using the Magic Loop Stitch for this pattern. If you are new to Magic Loop or if you’d just like a quick refresher, please visit my Helpful Tutorials page here.
If you would prefer a printable version of this pattern, please visit my Etsy shop. The small fee goes towards supporting my work, however the same pattern is also found below.
Pattern Instructions:
Head:
Rnd 1: With Aran colored yarn, 6 SC in a magic loop. Pull the free end snugly to close the loop. (6) If you’re new to Magic Loop or would just like a quick refresher, visit my Helpful Tutorials Page here.
Rnd 2: 2 SC in each ST around. (12)
Rnd 3: *2 SC in the next ST, SC in the next ST.** Repeat from * to ** around. (18)
Rnd 4: *SC in the next 2 ST, 2 SC in the next ST.** Repeat from * to ** around. (24)
Rnd 5: *SC in the next 3 ST, 2 SC in the next ST.** Repeat from * to ** around. (30)
Rnd 6: *SC in the next 4 ST, 2 SC in the next ST.** Repeat from * to ** around. (36)
Rnd 7-10: SC in each ST around. (36)
Rnd 11: Color change to Latte Stripe yarn. SC in the next 9 ST, *SC in the next ST, 2 SC in the next ST.** repeat from * to ** 8 times more. SC in the remaining 9 ST of the round. (46)
Rnd 12: SC in the next 9 ST. *SC in the next 2 ST, 2 SC in the next ST,** Repeat from * to ** eight times more. SC in the remaining 9 ST of the round. (54)
Rnd 13: SC in the next 9 ST, *SC in the next 3 ST, 2 SC in the next ST.** Repeat from * to ** eight times more. SC in the next 9 ST to complete the Rnd. (61)
Rnd 14-17: SC in each ST around. (61)
Rnd 18: SC in the next 9 ST. *SC in the next 3 ST, decrease.** Repeat from * to ** 8 more times. SC in the last 9 ST of the Rnd. (54)
Rnd 19: SC in each ST around. (54)
Rnd 20: SC in the next 9ST. *SC in the next 2 ST, Decrease.** Repeat from * to ** 8 more times. SC in the remaining 9 ST of the Rnd.(45)
Rnd 21: *SC in the next 3 ST, decrease.** Repeat from * to ** around. (36)
Place Amigurumi Safety eyes and two safety noses for nostrils in desired placement. Ensure secure placement to avoid choking hazard for small children.
Rnd 22: *SC in the next 3 ST, decrease.** Repeat from * to ** around. (30)
Rnd 23: *SC in the next 3 ST, decrease.** Repeat from * to ** around. (24)
Rnd 24: *SC in the next 2 ST, decrease.** Repeat from * to ** around. (18)
Stuff head firmly with fiberfill.
Rnd 25: *SC in the next ST, Decrease.** Repeat from * to ** around. (12)
Rnd 26: Decrease around. (6)
Fasten off leaving a long tail for stitching. Using a yarn needle and the long tail, Weave the tail through the BLO of each stitch of the round. Pull the tail snugly to close the seam. Secure with a knot and weave in end.
Ears (Make 2)
Rnd 1: With Aran yarn and size F hook, make 6 SC in a magic loop. Pull the free end snugly to close the loop. (6)
Rnd 2: SC in each ST around. (6)
Rnd 3: *SC in the next ST, 2 SC in the next ST.** repeat from * to ** around. (9)
Rnd 4: SC in each ST around. (9)
Rnd 5: *SC in the next 2 ST, 2 SC in the next ST.** Repeat from * to ** around. (12)
Rnd 6: *SC in the next 3 ST, 2 SC in the next ST.** Repeat from * to ** around. (15)
Rnd 7: *SC in the next 4 ST, 2 SC in the next ST.** Repeat from * to ** around. (18)
Rnd 8: *SC in the next 5 ST, 2 SC in the next ST.** Repeat from * to ** around. (21)
Rnd 9: *SC in the next 6 ST, 2 SC in the next ST.** Repeat from * to ** around. (24)
Rnd 10: SC in each ST around. (24)
Rnd 11: *SC in the next 2 ST, decrease.** Repeat from * to ** around. (18)
Fasten off, leaving a long tail for stitching.
Inner Ears: (Make 2)
Rnd 1: With Latte Stripe yarn and size F hook, make 6 SC in a magic loop. Pull the free end snugly to close the loop. (6)
Rnd 2: 2SC in the next 3 ST. 2 DC in the next ST. 2 SC in the remaining 2 ST of the Rnd. SLST in the first ST of Rnd. Fasten off, leaving a long tail for Stitching. Fold the Ear piece from the previous section in half. ST the Inner Ear to the Ear piece. Once completed, stitch the ear piece to the head of the cow.
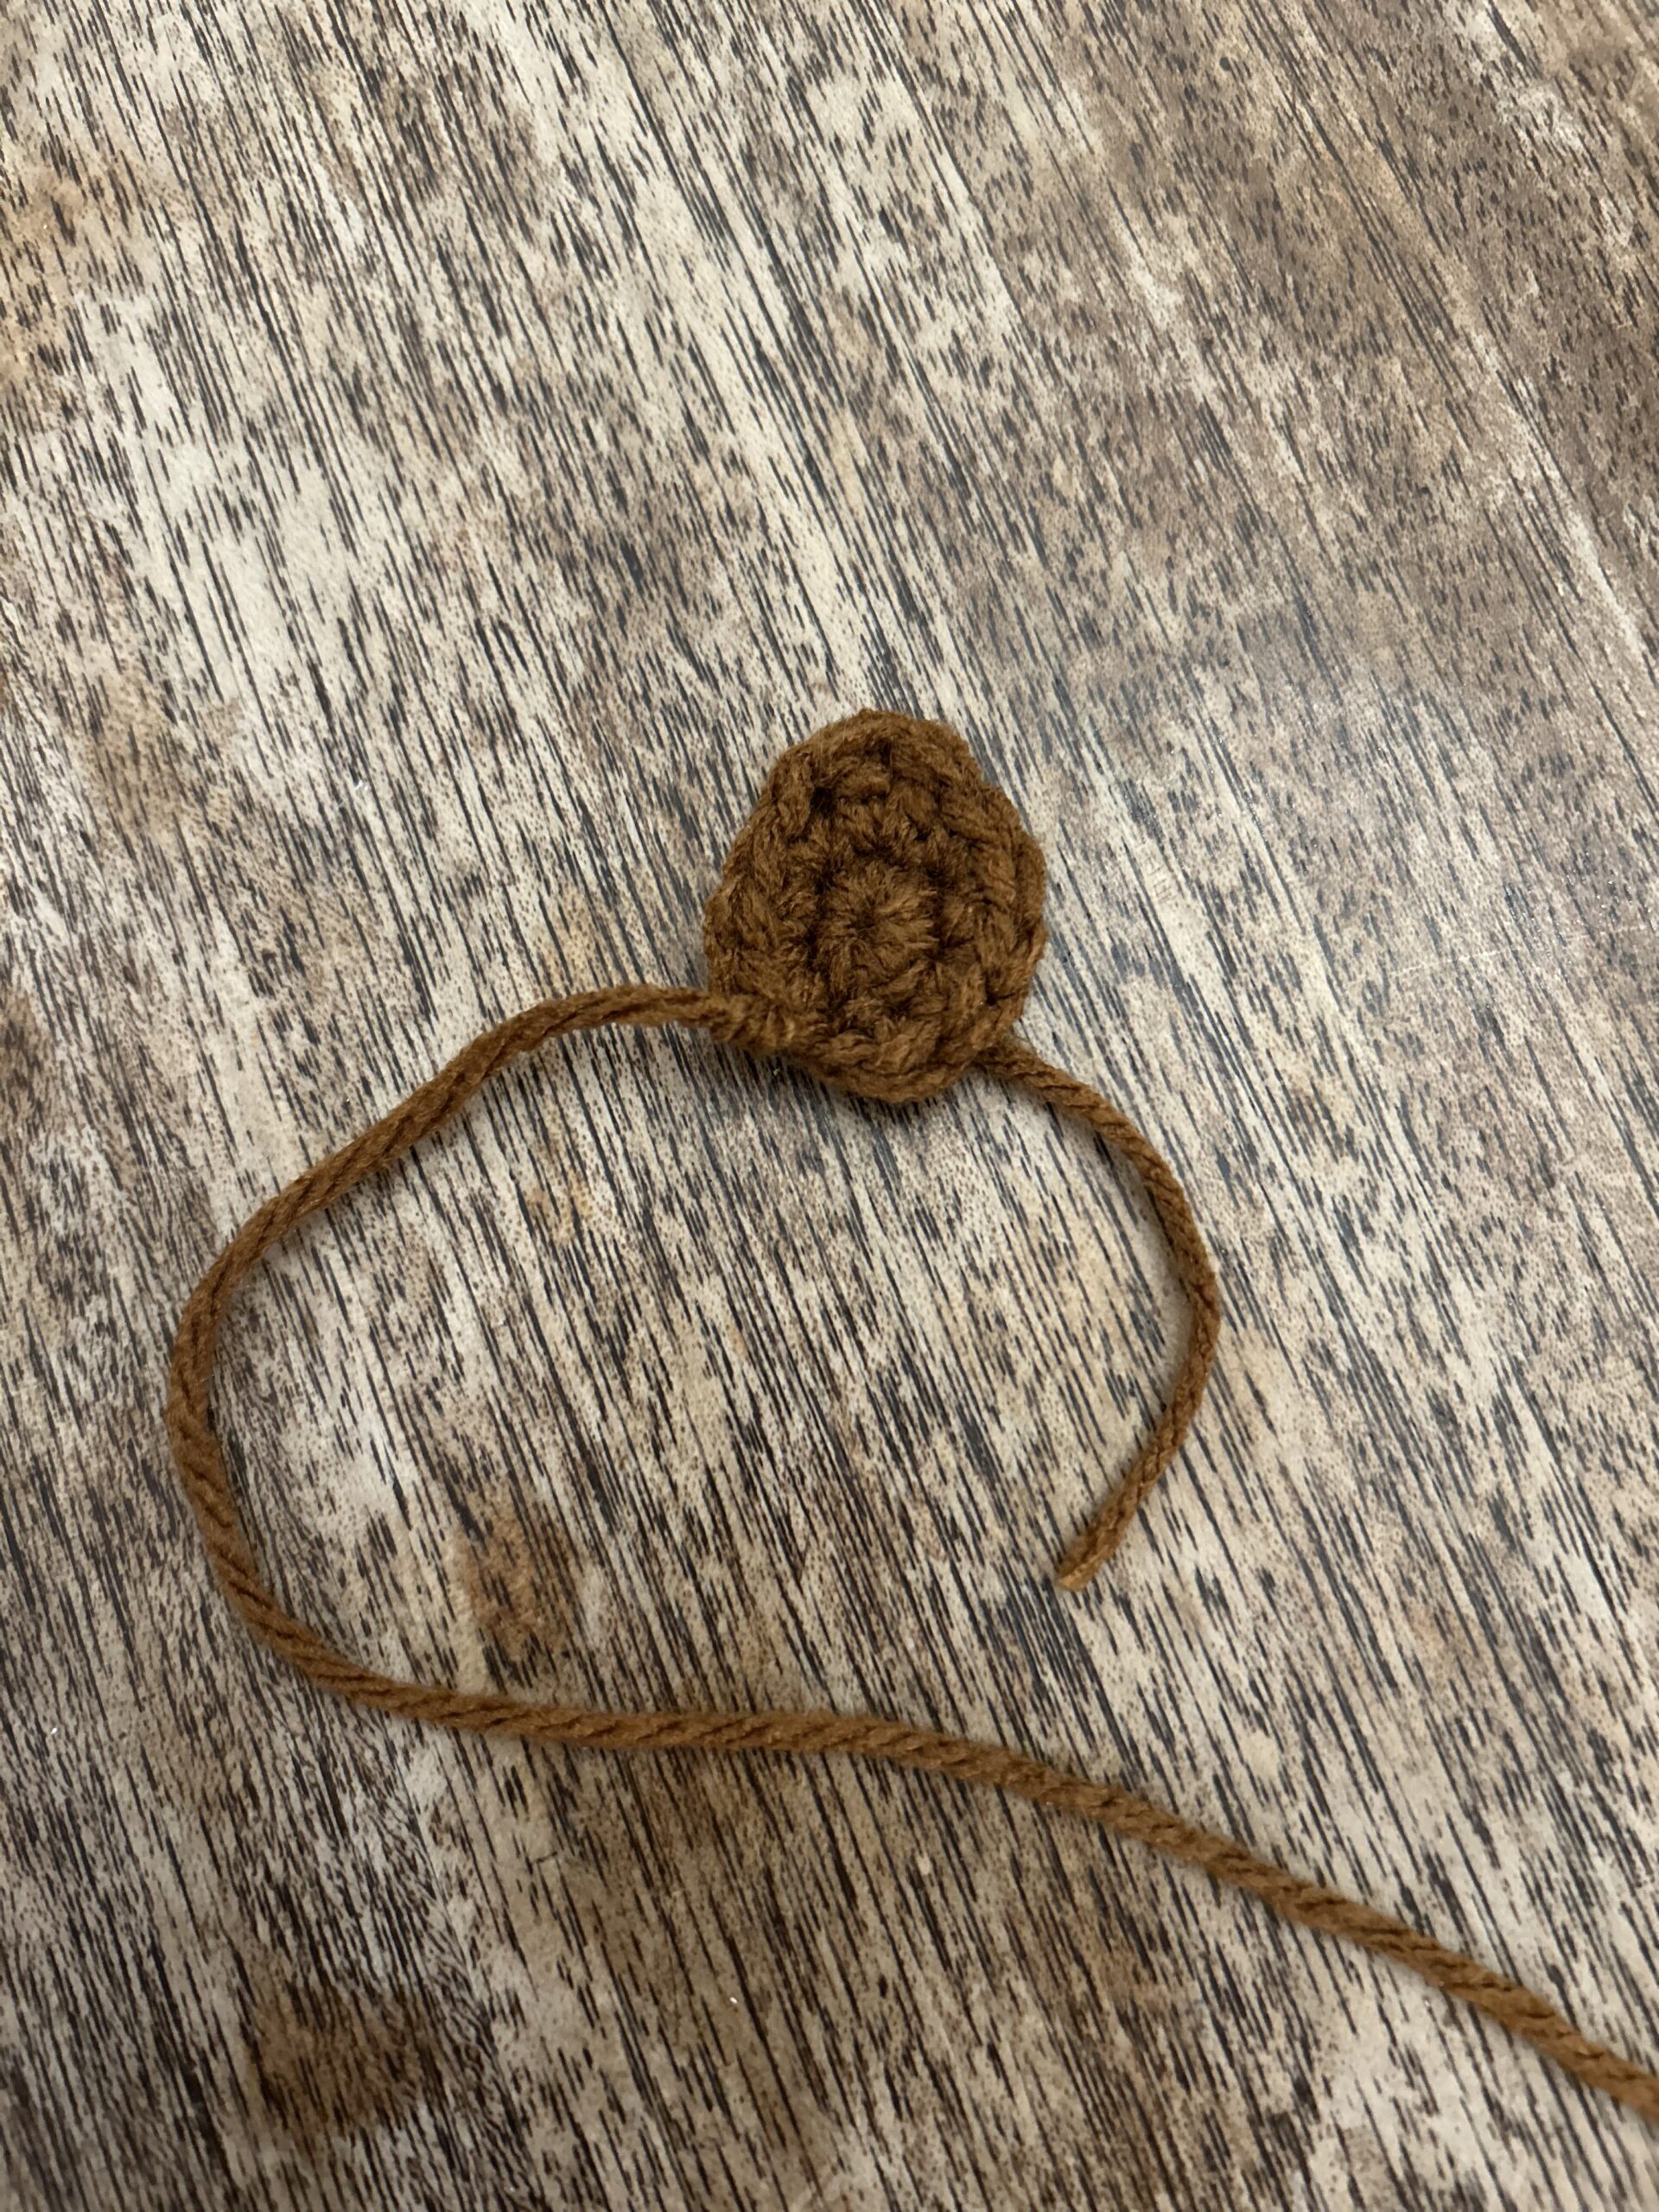
Horns (Make 2)

Rnd 1: With size F hook and Aran yarn, make 6 SC in a magic loop. Pull the free end snugly to close the loop. (6)
Rnd 2: SC in each ST around. (6)
Rnd 3: *SC in the next ST, 2 SC in the next ST.** Repeat from * to ** around. (9)
Rnd 4: SC in each ST around. (9)
Rnd 5: SC in the next 6 ST, turn, leaving the rest of the Rnd unworked. SC in the 6 SC you just made for this row. Turn. (12)
Rnd 6: SC in the next 6 ST, continue working in the unworked stitches from the previous Rnd by working a SC in the next 3 ST to complete the Rnd. (9)
Rnd 7: SC in each ST around.
Rnd 8: SC in the next 6 ST, turn, leaving the rest of the Rnd unworked. SC in the 6 SC you just made for this row. Turn. (12)
Rnd 8: SC in the next 6 ST, continue working in the unworked stitches from the previous Rnd by working a SC in the next 3 ST to complete the Rnd. (9)
SLST in the first ST of the next Rnd and fasten off, leaving a long tail for stitching. Stuff with fiberfill. Using a yarn needle and the long tail, attach the horns to the top of the head.
Body:
Rnd 1: With Brown yarn and size F hook, make 6 SC in a magic loop. Pull the free end snugly to close the loop. (6)
Rnd 2: 2 SC in each ST around. (12)
Rnd 3: *SC in the next ST, 2 SC in the next ST.** Repeat from * to ** around. (18)
Rnd 4: *SC in the next 2 ST, 2 SC in the next ST.** Repeat from * to ** around. (24)
Rnd 5: *SC in the next 3 ST, 2 SC in the next ST.** Repeat from * to ** around. (30)
Rnd 6: *SC in the next 4 ST, 2SC in the next ST.** Repeat from * to ** around. (36)
Rnd 7: *SC in the next 5 ST, 2SC in the next ST.** Repeat from * to ** around. (42)
Rnd 8-17: SC in each ST around. (42)
Rnd 18: *SC in the next 5 ST, decrease.** Repeat from * to ** around. (36)
Rnd 19: *SC in the next 4 ST, decrease.** Repeat from * to ** around. (30)
Rnd 20: *SC in the next 3 ST, decrease.** Repeat from * to ** around. (24)
Rnd 21: *SC in the next 2 ST, decrease.** Repeat from * to ** around. (18)
Rnd 22:*SC in the next ST, decrease.** Repeat from * to ** around. (12)
Fasten off, leaving a long tail for stitching the body to the head. Stuff body firmly with fiberfill.
Using the long tail for stitching and a yarn needle, stitch the body to the head below the snout.
Legs (Make 4)
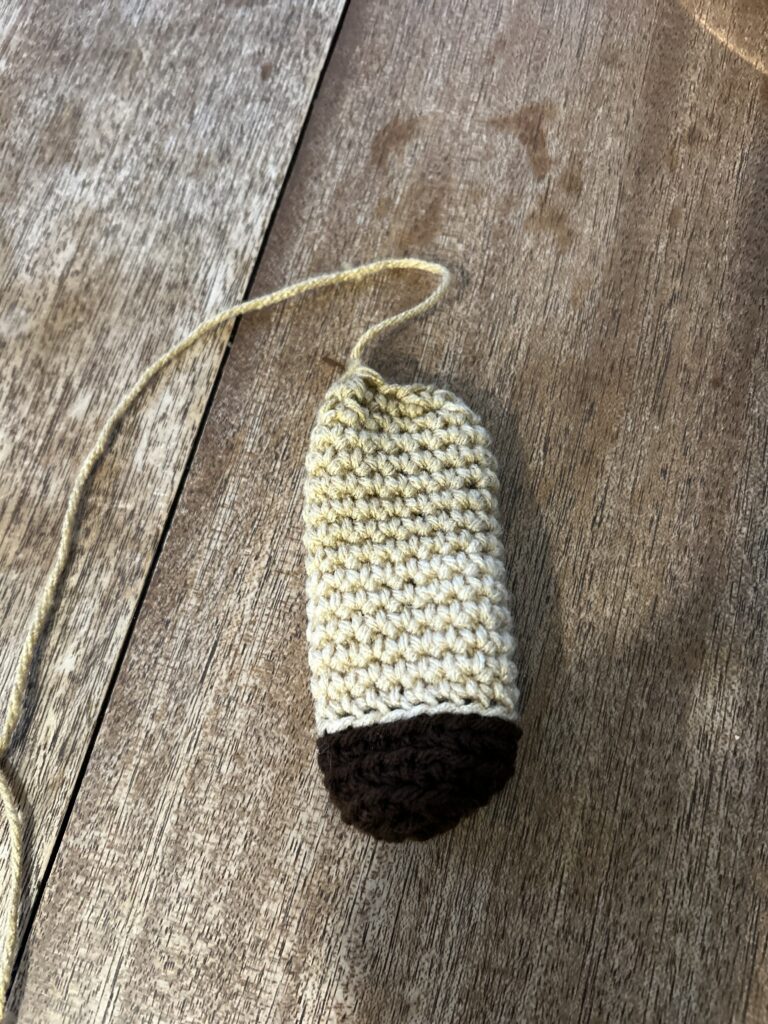
Rnd 1: With Dark brown yarn and size F crochet hook, make 6 SC in a magic loop. Pull the free end snugly to close the loop. (6)
Rnd 2: 2 ST in each ST around. (12)
Rnd 3: *SC in the next ST, 2 SC in the next ST.** Repeat from * to ** around. (18)
Rnd 4: SC in BLO of each ST around. (18)
Rnd 5: SC in each ST around. Color change to Light brown at the last pull through of the last ST. Fasten off Dark Brown.
Rnd 6: With Light Brown, SLST in each ST around. (15)
Rnd 7-18 SC in each ST around. (18)
Rnd 19: *SC in the next ST, decrease.** Repeat from * to ** around. (12)
Rnd 20: *SC in the next ST, decrease.** Repeat from * to ** around. (9) Fasten off, leaving a long tail for Stitching to the body.
Stuff with fiberfill.
Using a yarn needle and the long tail for stitching, stitch the leg to the body.
Tail:
Rnd 1: With Aran yarn and size F hook, make 6 SC in a magic loop. Pull the free end snugly to close the loop.(6)
Rnd 2: *SC in the next ST, 2 SC in the next ST.* Repeat from * to ** around. (9)
Rnd 3-5: SC in each ST around. (9)
Color change to tan yarn at the last pull through of the last stitch of the round.
Rnd 6: With Tan yarn, SLST in each ST around. (9)
Rnd 7-18: SC in each ST around. (9)
Fasten off, leaving a long tail for Stitching.
Stuff tail lightly with fiberfill.
Using the long tail for stitching and a yarn needle, stitch the tail to the body. Weave in end.
Mane: To make the mane, Cut 5, seven inch long lengths of yarn. Separate the yarn strands of each length of yarn so that there are two strands of yarn in each length rather than 4. Line each of the strands so that the ends are even with each other. Now using a crochet hook, insert hook into the stitch on the head where you would like to place the mane. Pull the yarn strands through as one bulky strand. Knot the strand to secure in place. Repeat, several times in different stitches around the head to create a full mane. Repeat for the end of the tail if desired.
This pattern and its images are copyright protected and the sole property of Briarberryfarmhouse.com
Please do not redistribute, transfer, or sell the pattern, or alter it to claim as your own. You may sell any products you create from this pattern. Please credit the designer by linking online listings to Briarberryfarmhouse.com or tagging @Briarberry on Instagram.
Other Ideas You Might Enjoy:
Looking for more ideas? Try one of these:
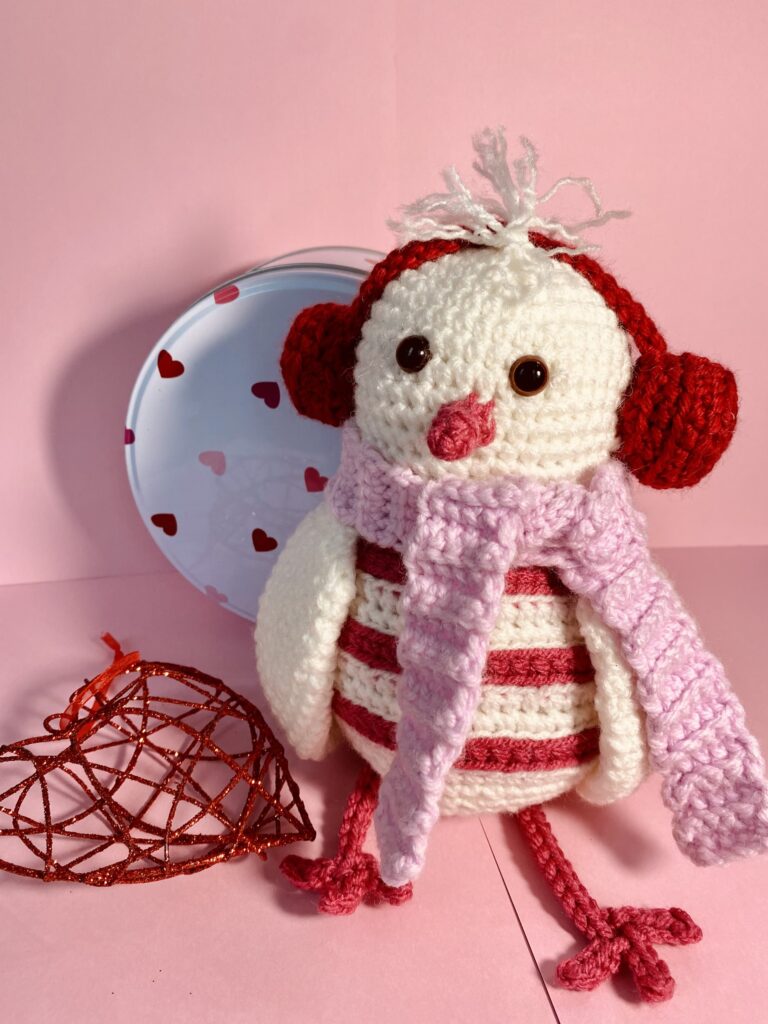
Little Love Bird: If you’re looking for a cute valentine gift or fun toy to crochet for a friend or child, try the Little Love Bird.
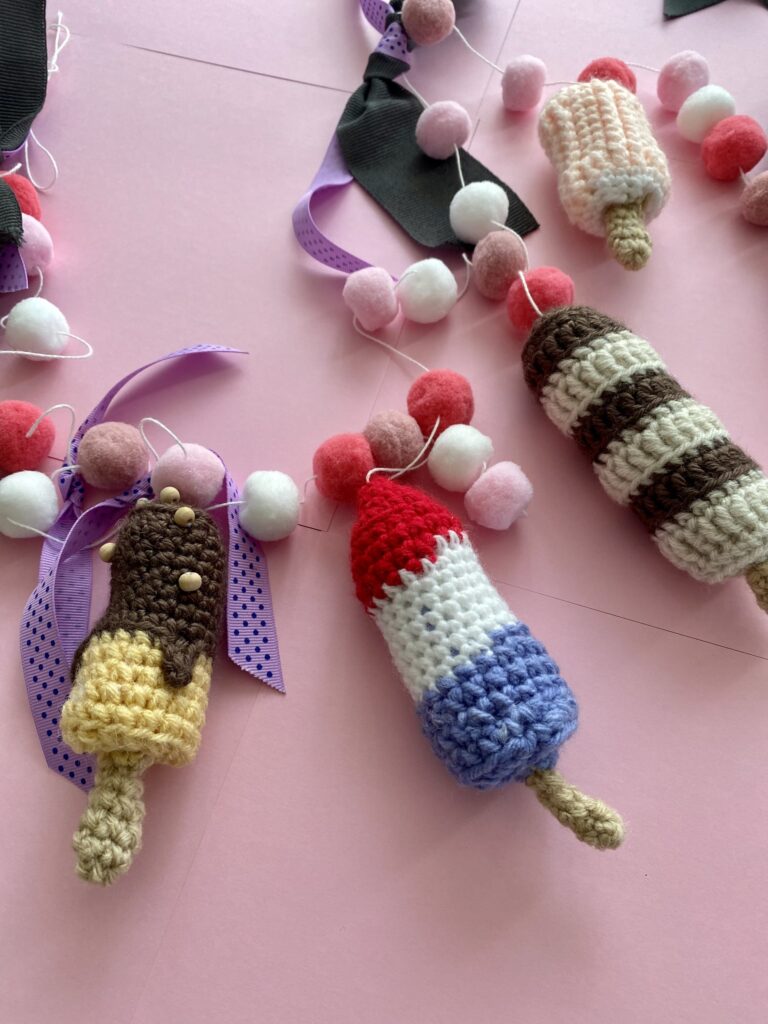
Summer Popsicle Garland: Feeling Nostalgic for Summer? I am! This fun and easy popsicle garland is a nice cure for the winter blues.
Briarberry
My name is Abby Holmgren and I love to create and share ideas through crochet, sewing, fashion, cooking, and visual arts. Briarberry Farmhouse is where I share inspiration.