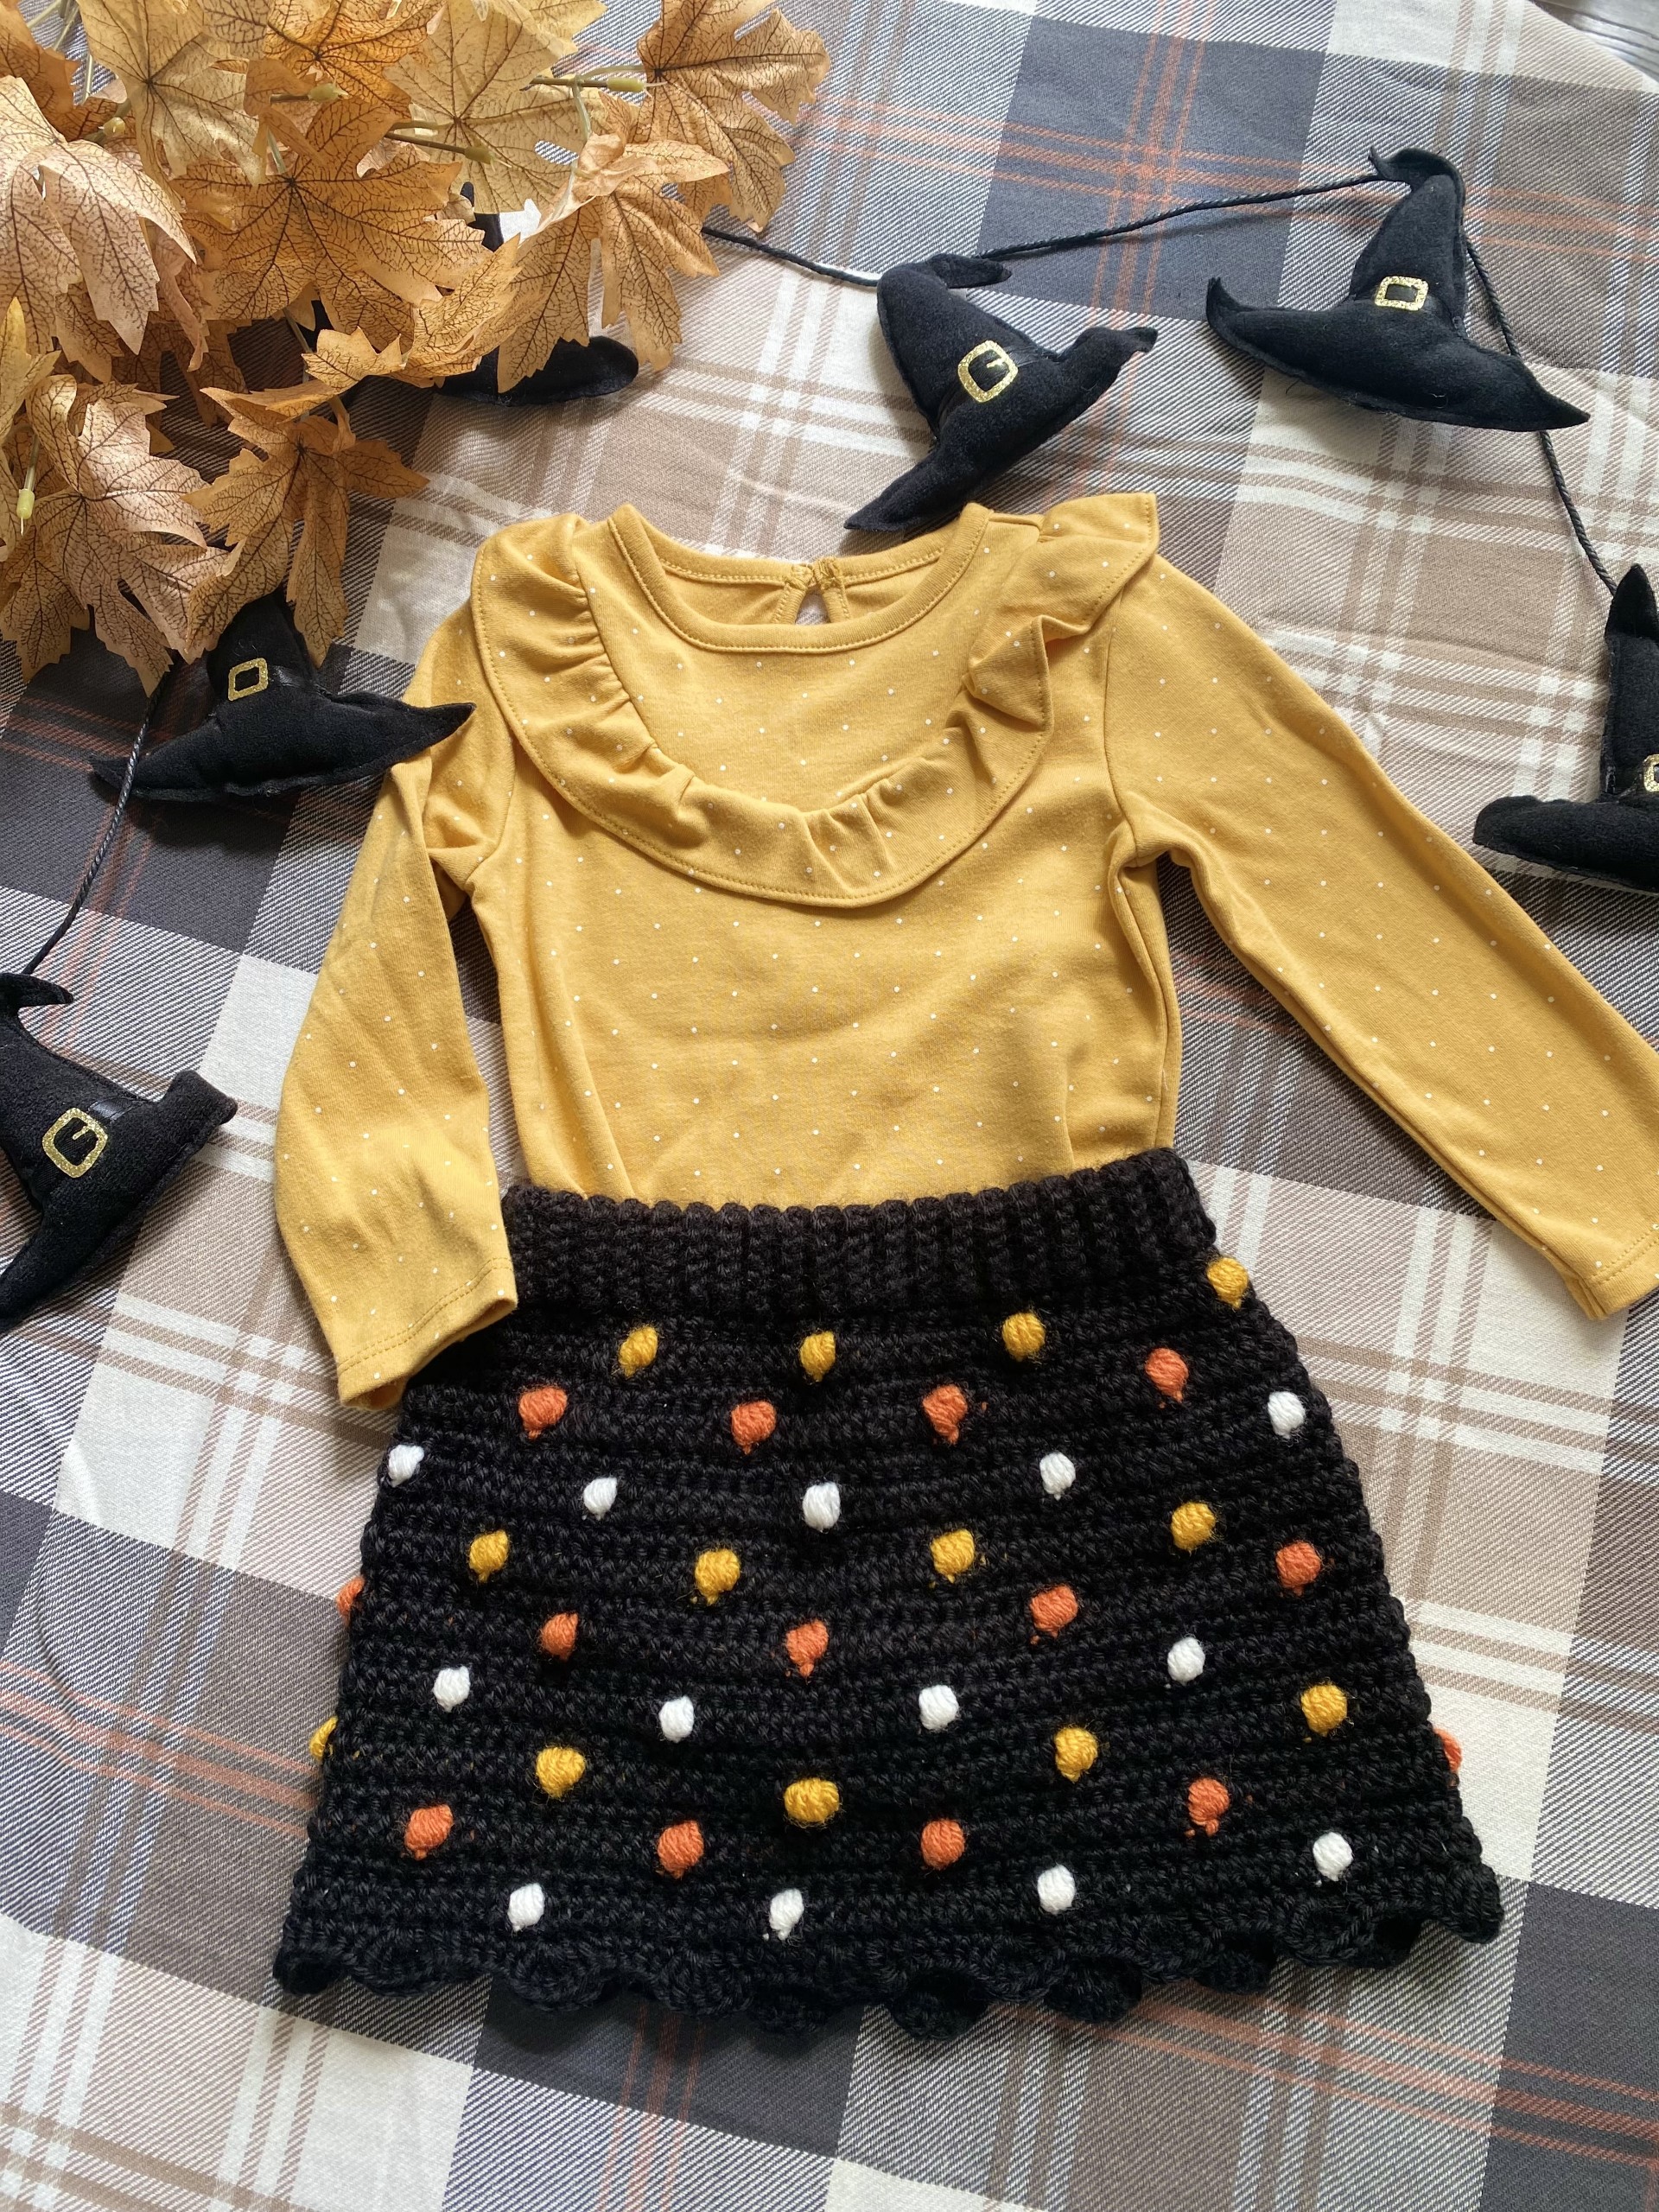
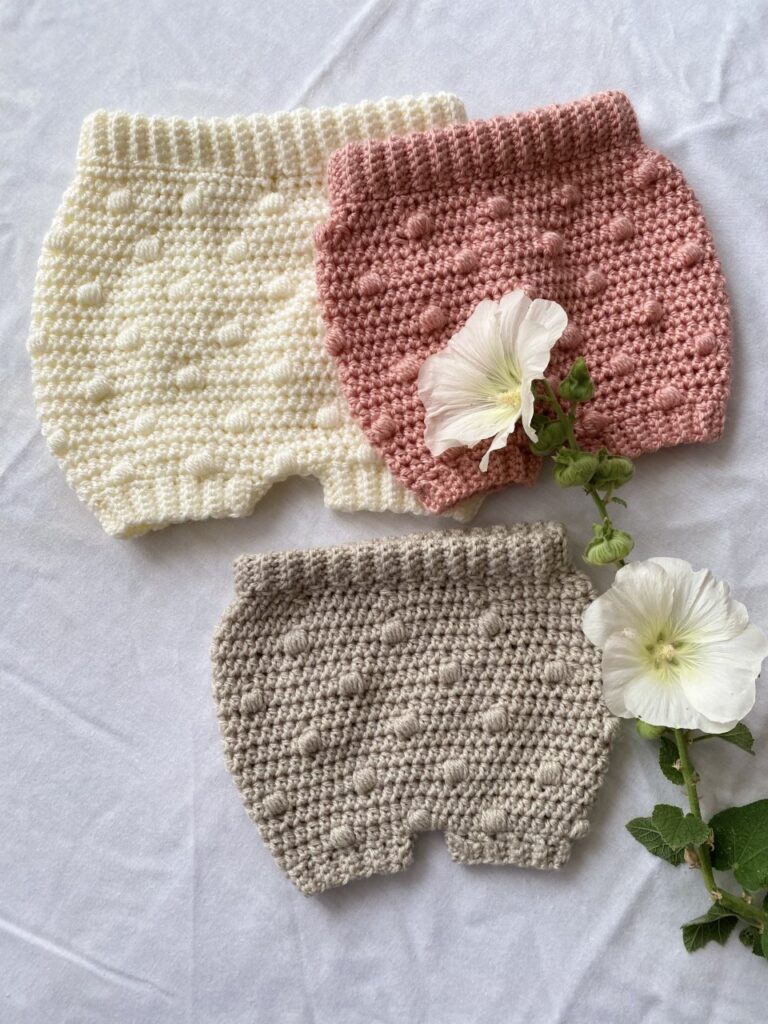
Bloomers for Baby
The smell of baby powder and lotion. The natural inclination to speak in a whisper. The way everything is just so tiny. The coordinated outfits and blankets. The little sneezes and cuddles. How quickly your heart is completely stolen by a tiny little person. I can’t think of anything as magical as the birth of a new baby.
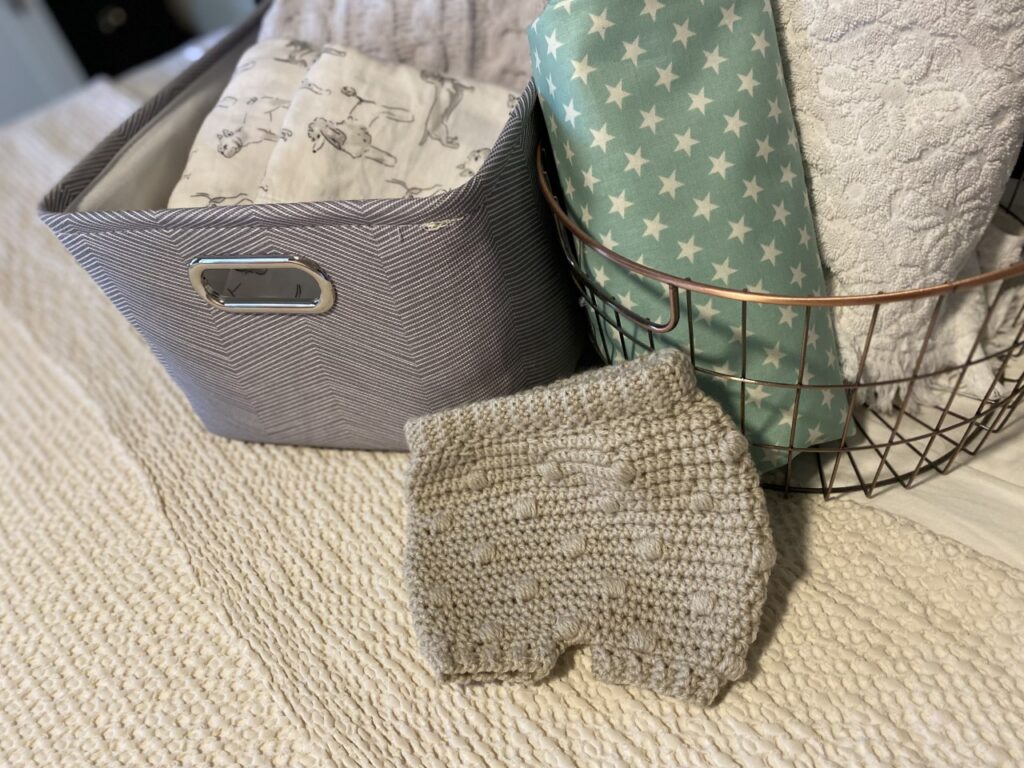
These baby bloomers are a great addition the Little Ones new wardrobe whether you are nesting, hoping, last minute prepping or just adding one last thing to the collection of surprises for your baby, I hope this pattern makes the list and adds to the diaper-bum-cuteness overload.
Quin Bloomers
Materials:
- 1 skein softee baby yarn in your color of choice.
- Size 3.5 mm crochet hook for ribbing and size 5.00 mm crochet hook for body of the work.
- 3/8 ” flat elastic waistband
- yarn needle
Gauge:
16 stitches x 12 rows = 4″ square
Pattern used for gauge: HDC
Sizes:
Newborn: width at waistband 18.5 cm x length 17 cm.
0-6 months; width at waistband 19 cm x length 19 cm.
6-12 months: 23 cm width at waistband x 24 cm length.
Abbreviations:
BLO- Back loops only
CH – chain
SC: Single Crochet
HDC – Half-double Crochet
SLST – Slip Stitch
ST(S) – Stitch(es)
SK – Skip
5HDCB: 5 half double crochet bobble
Notes:
These baby bloomers are fun to make and work up quickly. They begin at the bottom with ribbing panels that form the leg of the bloomers and then work in a bobble pattern that creates a polka dot look. Finally finishing off at the top with a ribbed elastic waistband. Three different sizes are offered for this pattern. You will see the newborn sizing outside of parentheses and the the 0-3 month sizing and 3-6 month sizing inside of the the Parentheses. Newborn(0-3, 3-6) Let’s get started.
Special Stitches:
5 HDC Bobble (5HDCB): Tutorial………
Pattern Instructions:
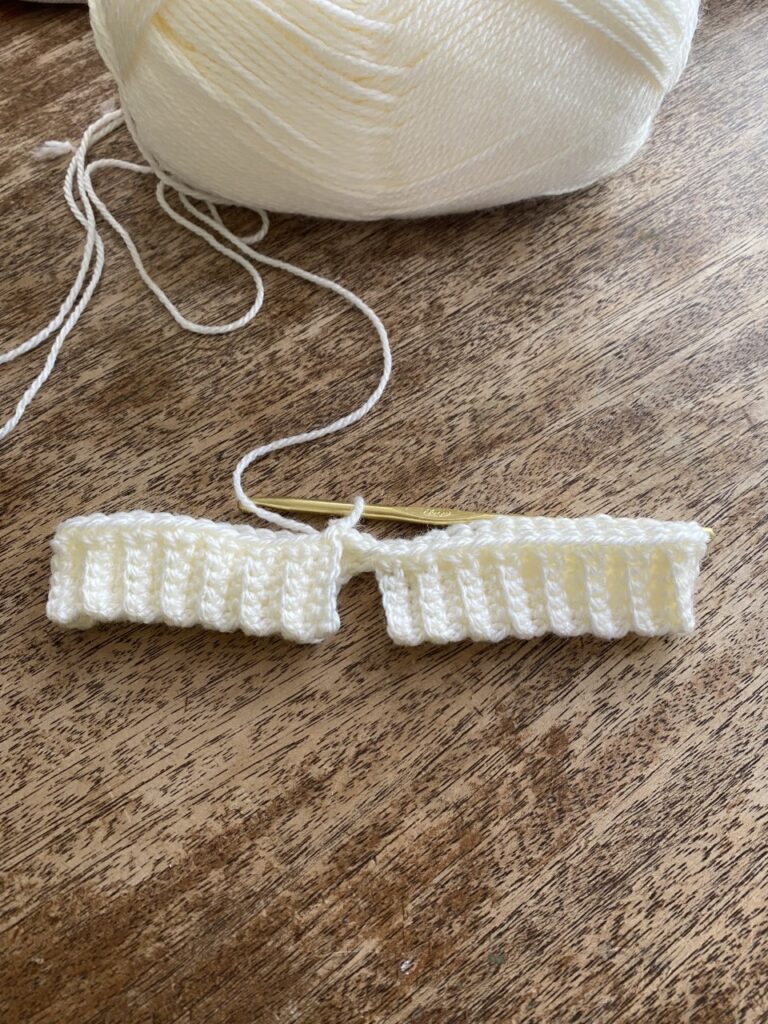
Ribbing Panels for the legs: (Make 2)
Rnd 1: Using size 3.5 (E) hook and 3 light yarn, CH 4(5,6)
Rnd 2: SC in second chain from the hook and in each chain across. CH 1, turn.
Rnd 3- 20(25, 30 ) SC in BLO of each stitch across. CH 1, turn. After completing 2 rows for NB size, 25 for 0-6 month size, or 30 rows for 6-12 month size, fasten off.

Fold ribbing panels in half. Position open edges towards center. See Photo. Switch to size 5.00 mm crochet hook. Attach yarn with a slip stitch to the top corner stitch of the left side ribbing panel.
BODY:
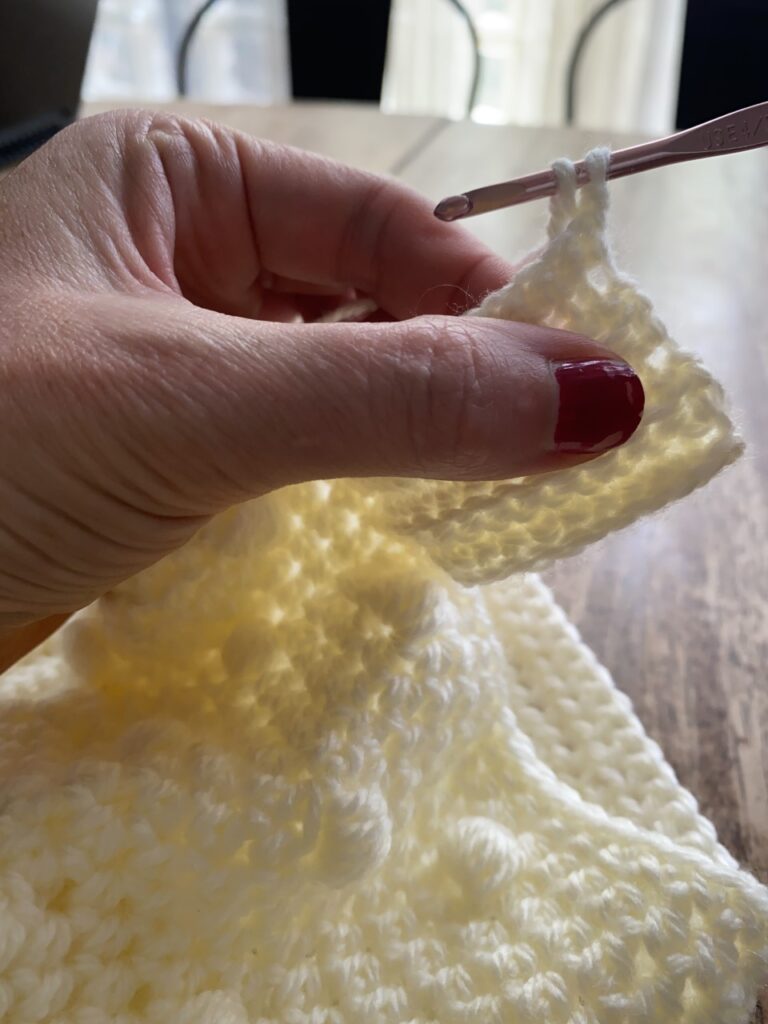
Rnd 1: With size 5.00 (H) mm crochet hook. SC in the top stitch of each row across the top of the ribbing panel. 20(25, 30) stitches. CH 3, SC in the top corner stitch of the other ribbing panel. SC in the top stitch of each row of the second ribbing panel. 20( 25, 30) sc stitches. CH3. Ensuring the row is not twisted , SLST into first SC of this row to join. See Photo at bottom right. 46(56, 66)
Rnd 2: CH1, *HDC in next 5 St.( 5HDCB , CH 1)( See photo tutorial) in next stitch. ** Repeat from * to ** around, including the chain 3 stitches. SLST into top of ch 1 from beginning of round.
Rnd 3: CH1, HDC in each ST around, including in the CH1 stitch at top of bobbles. 55(65, 75). SLST into top of CH 1 from beginning of round.
Rnd 4: Ch 1, HDC in each stitch around. SLST into top of CH1 from beginning of round.
Rnd 5: HDC in next 2 stitches.* (5HDCB, CH1) in next ST. HDC in next 6 ST.** Repeat from * to ** around. SLST into top of Ch1 from beginning of round.
Rnd 6: CH1. HDC in each ST around including in the CH1 at the top of each Bobble. 76(81, 86) SLST into top of CH1 from beginning of round.
Rnd 7: CH1, HDC in each stitch around. SLST into top of CH1 from beginning of round.
Rnd 8: CH1, * (5HDCB, CH1) in next stitch. HDC in next 7 ST.** Repeat from * to ** around. SLST into top of CH1 from beginning of round.
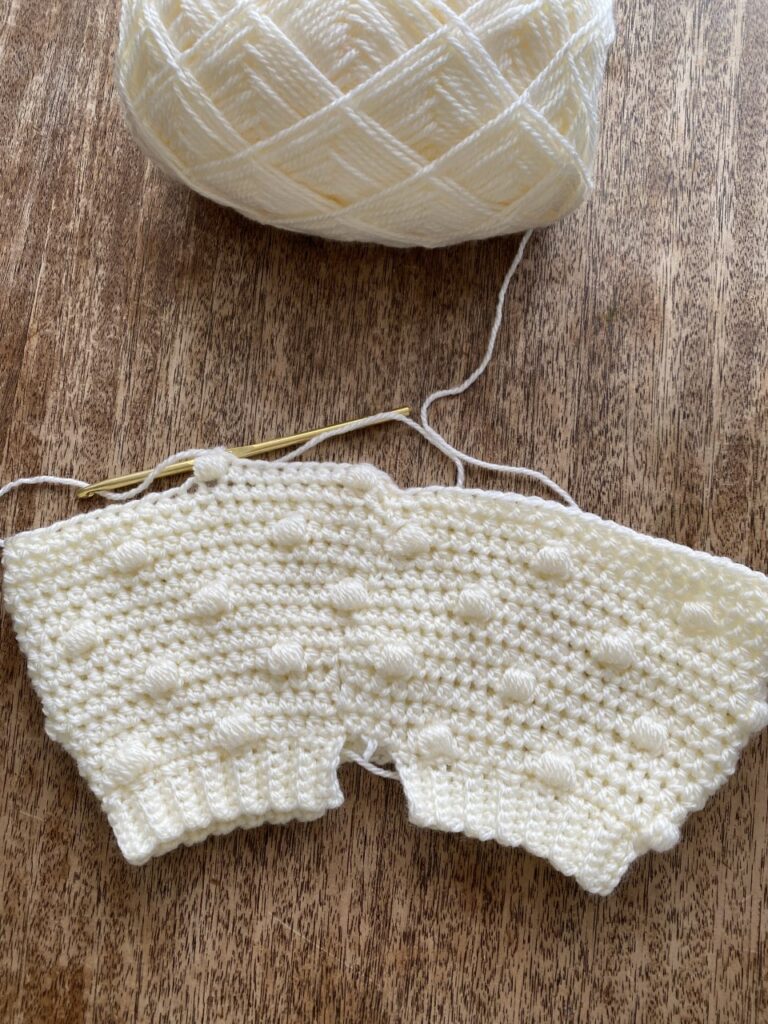
Rnd 9: CH1. HDC in each stitch around EXCEPT for the CH1 at the top of bobbles. Skip the CH1 in this round. This allows us to maintain the number of stitches needed without increasing. SLST in top of CH1 from beginning of round.
Rnd 10: CH 1, HDC in each stitch around. SLST in top of CH 1 from beginning of round.
Rnd 11: CH1, HDC in next 5 ST, * (5HDCB, CH1) in next ST, HDC in next 7 ST.** Repeat from * to ** around. SLST into top of CH 1 from beginning of round.
Rnd 12: CH 1, skipping the CH 1 in the top of each bobble stitch, HDC in each stitch around. SLST into top of CH 1 from beginning of round.
Rnd 13; CH 1, HDC in each ST around. SLST into top of CH 1 from beginning of round.
Rnd 14: CH1, HDC in next ST. * (5HDCB, CH1) in next ST. HDC 7. ** Repeat from * to ** around. SLST into top of CH 1 from beginning of round.
Rnd 15: CH 1, skipping the CH 1 at the top of the bobble stitches, HDC in each HDC around. SLST into top of CH 1 from beginning of round.
Rnd 16: CH 1,* HDC in next 6 ST. HDC 2 together to decrease. ** Repeat from * to ** around. SLST into CH 1 from beginning of round.
For NB size, skip to Rnd 22. For 0-3 month and 6-12 month sizes, continue to Rnd 17.
Rnd 17: CH 1, HDC in next 6 ST. * (5HDCB, CH 1) in next ST, HDC in next 6 ST.** Repeat from * to ** around. SLST into top of CH 1.
Rnd 18: CH 1, HDC in each HDC around, skipping the CH 1 at the top of bobble stitches. SLST into CH 1 from beginning of round.
For 0-6 month size, skip to Rnd 22, at this point. For 6-12 month size continue to Rnd 19.
Rnd 19: CH 1, HDC in each HDC around. SLST into CH 1 from beginning of round.
Rnd 20: HDC in next 4 ST. * (5HDCB, CH 1 ) in next St. HDC in next 6 ST.** Repeat from * to ** around. SLST into CH 1 from beginning of round.
Rnd 21: CH 1, HDC in each HDC around, skipping the CH 1 at the top of bobble stitches. SLST into top of CH 1 from beginning of round.
Rnd 22: Switch to size 3.5 mm hook. Ch1. SC in each stitch around. SLST into CH 1 from beginning of round. Don’t fasten off. Continue on to Waistband.
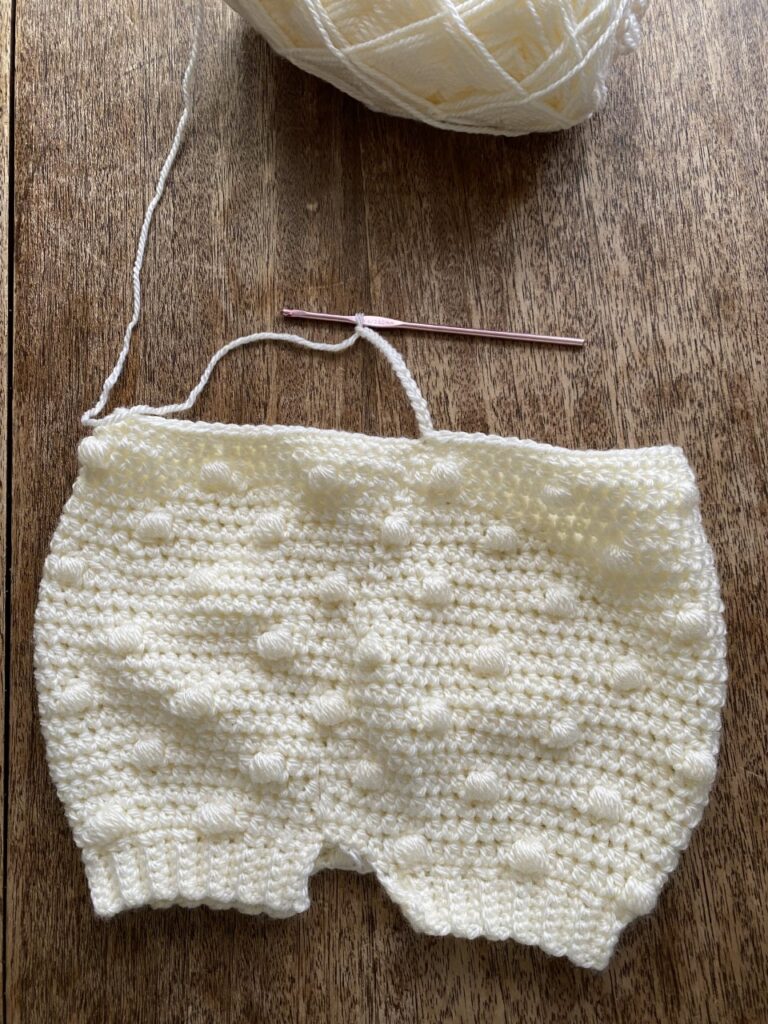
Waistband:
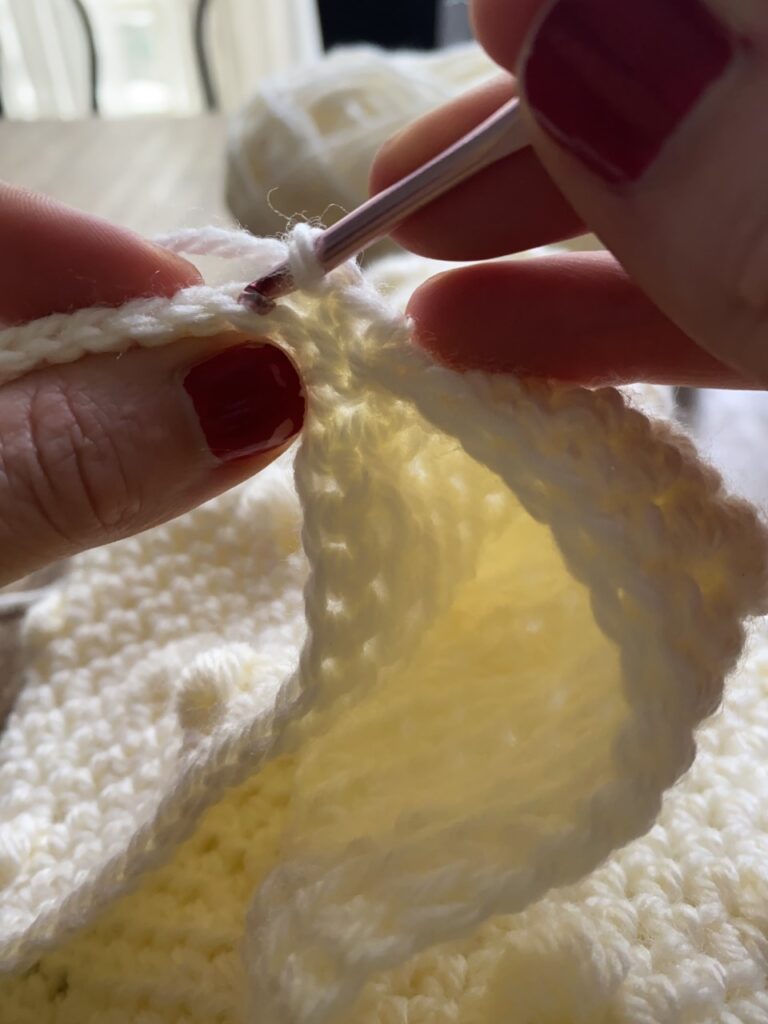
Ribbed Waistband:(See Tutorial below)
One of the best parts of these bloomers is the elastic waistband to keep them snug. This part is a little challenging at first but you can do it. Refer to tutorial pictures above for visual clarification.
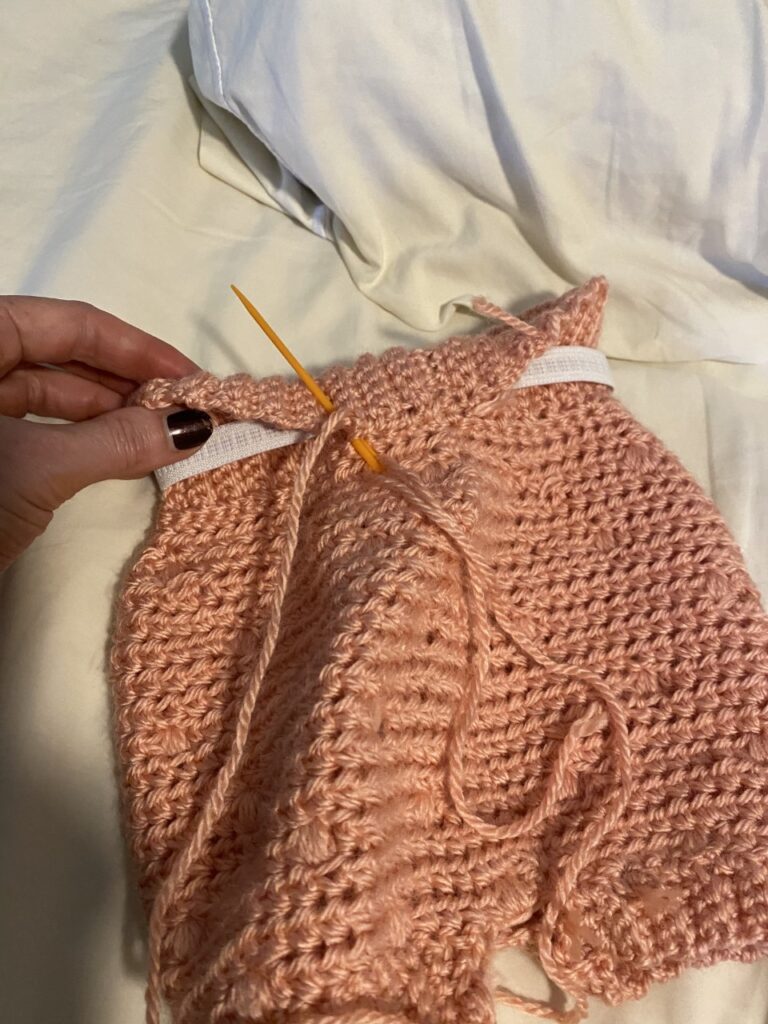
From back middle stitch begin a chain. CH 9(13, 15) ( see photo above.)
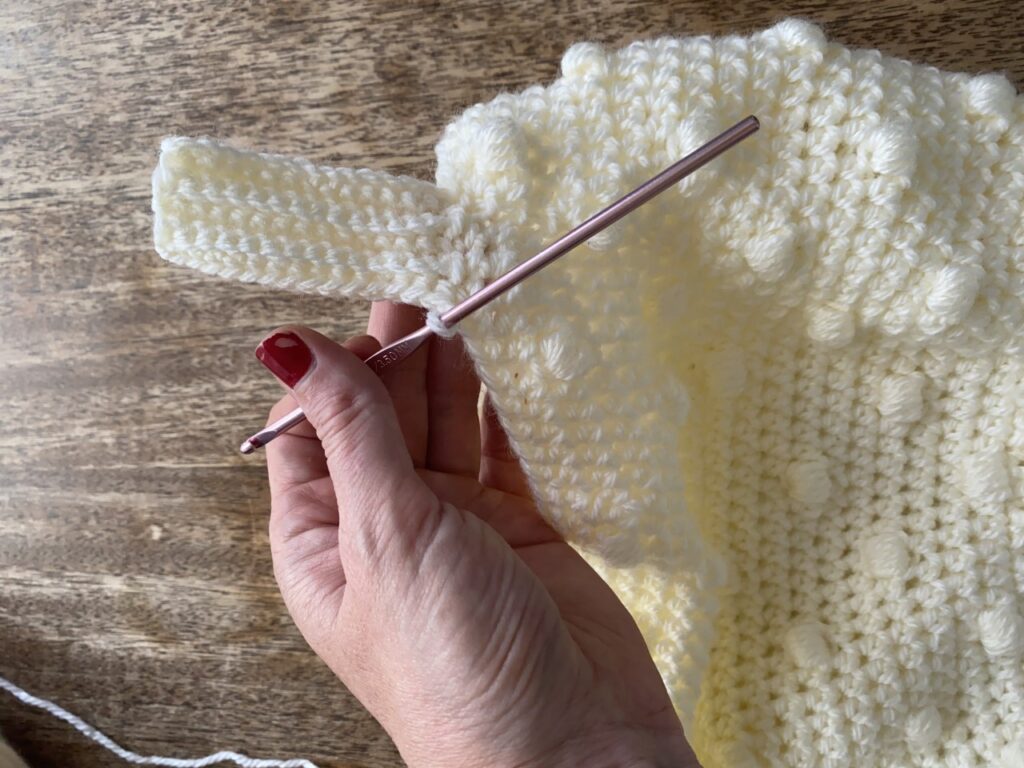
RND 1: SC in second CH from hook and in each SC of CH. You should have 8(12, 14) SC . Anchor this row to the top of the bloomers by SLST in the next stitch to the left. of beginning chain stitch. ( See photo tutorial) . Now SLST in one more ST to the left to begin the next row. Turn.
Rnd 2: Move trailing yarn to back of work, In BLO, SC in each SC to the top of the ribbing panel. CH 1, Turn.
Rnd 3: In BLO, SC in each stitch, working your way back to the top of the body of the bloomers. Anchor to bloomer body with a SLST. SLST again in the next ST to the Left. Turn.
Repeat rows 2-3 around full circle of bloomer body. Fasten off leaving a long tail to stitch the edges of the waistband together. Using a yarn needle, stitch edges together. See picture.
Extra Help Tutorial:
- From back center stitch, CH 9(13, 15).

2. SC in second chain from hook and in each ST moving back towards body of bloomer.
Anchor this row with a SLST in the next ST to the left at the top of the bloomer body.

3.SLST one more time in the next ST to the left to begin the next row.
4. Turn, Move yarn to back of work and in BLO, SC in each ST to the top of ribbing panel.

5.CH 1 Turn. SC in BLO in each ST of ribbing panel back to top of bloomer .
6. Anchor with SLST in next ST to the left.
7. Begin next row with a SLST in next ST to the left. Continue working ribbing panel back and forth working your way around the top of the bloomers.
8. Soon you will see a ribbed waistband beginning to form. It seems too long because we will be folding it over to create a casing for the elastic waistband.
Waistband Continued:
Assembly:
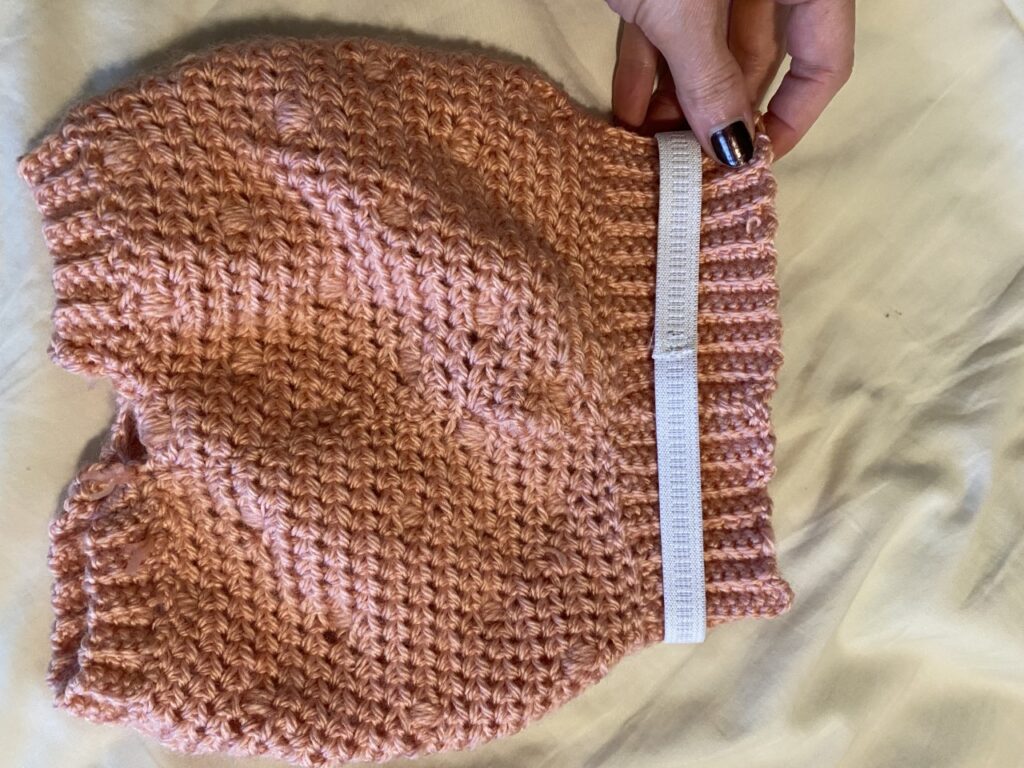
Cut a piece of elastic waistband. I used these measurements:
Newborn: 38 cm
0-3 month: 43 cm
3-6 month: 48 cm
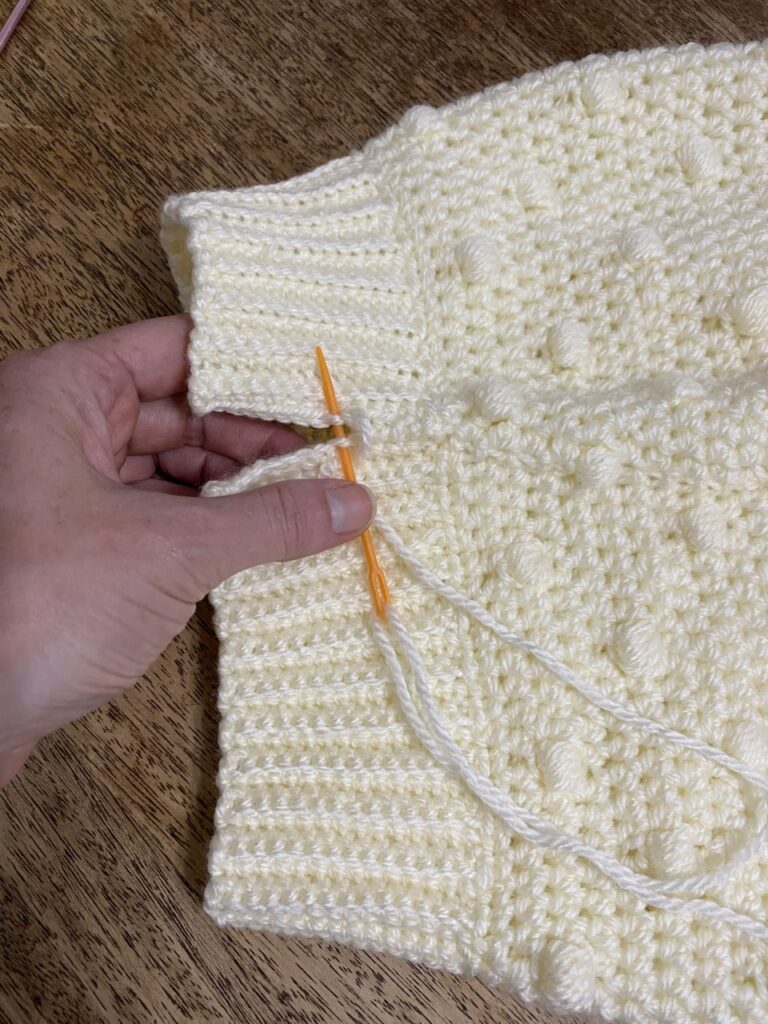
With a needle and thread. Stitch edges of elastic together to form a circle, ensuring that elastic is not twisted.
Turn bloomer inside out. Position the elastic waistband around the crocheted ribbed waistband. Fold the crocheted waistband in half over the top of the elastic. Now, using a yarn needle, stitch around the base of the waistband to create a casing. See photos.
Using a yarn needle, stitch crotch seam. Clip loose yarn ends and weave into work. Turn right side out. You did it!
If you would prefer a downloadable print version of this pattern, click the download button.
Copyright
This pattern and its images are copyright protected and the sole property of Abby Holmgren. Please do not redistribute, transfer, or sell the pattern, or alter it to claim as your own. You may sell any products you create from this pattern. Please credit the designer by linking online listings.
Briarberry
My name is Abby Holmgren and I love to create and share ideas through crochet, sewing, fashion, cooking, and visual arts. Briarberry Farmhouse is where I share inspiration.

You May Also Like